After getting rid of my inhibitions about the 'cloud', I finally decided to embrace it and have begun my journey towards cloud knowledge through attempting to explore the depths of AWS, the giant of the cloud world.
In this article I describe how I launched my first EC2 instance. EC2 (Elastic Compute Cloud) is Amazons' compute/IAAS offering.
I created my account on AWS' website www.aws.amazon.com and opted for the year long free tier subscription.
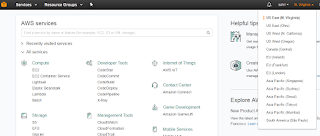
Once a user logs in they are presented with the below screen:

Once logged in we can choose a among a number of regions where we'd like to spin up our instance.
Let me briefly talk about a couple of terms namely regions, availability zones and edge locations as one would often come across these while learning AWS.
Region: A region is a geographic location where AWS has presence.
Availability zone: This fundamentally represents an AWS data center within a region. A region may have multiple availability zones.
Edge location: An edge location is an entity within a region where we cannot spin up instances but we can consume some of the services offered by AWS. For example, an edge location may be used to house a DNS server.
To view your current region and list out the available regions, expand on the upper right tab next to your name as shown in the below screenshot:
From that I can determine that at present any instances I spin up will be created within the N.Virginia region.
Now click on EC2 and you will be presented with the EC2 dashboard.

If we scroll down to the service health section we can get the health status of the region as well as availability zones within the region. N.Virginia is the oldest region btw and therefore newly launched services are usually made available in this region first.

To create a new instance just click on 'launch instance' button.

This will take us through a setup wizard at the end of which our instance will be launched.
The first step is to choose an AMI (Amazon machine image) to launch. We are presented with a number of options and notice that some of the AMIs have 'free tier eligible' written against them. Only those AMIs can be launched under the free tier and remaining would be paid.

I opted for Amazon Linux and so clicked the select button against that option.
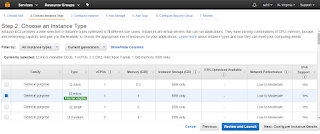
Next we are presented with another set of options which are basically compute resource configurations with our free tier eligible option pre-selected for us. From this list we can opt for a paid bigger AMI.
I'll stick to the free tier option. At this point we can review and launch the instance or do some further configuration with it. I selected the second option.
We are then presented with the below screen:

At this juncture we are given a number of options that we can modify as per our requirement. I'll talk about some of these options:
Number of instances is the number of VMs that we'd like to deploy.
Spot instances: This is basically unused capacity available at a discounted price which the customers can bid for. The customer with the highest bid will get that capacity.
VPC(virtual private cloud): This allows us to create a logical network that is isolated from the rest of AWS.
IAM (Identity and access management): This helps us to implement user access/privilege control mechanisms via RBAC or other methods.
We can review and launch the instance of click on add storage. I won't be adding any storage in this article yet I'll click on it.

This shows us our current storage settings, presents us with the option of adding additional storage and also tells us that free tier storage additions are limited to 30GB.
Then in the next step we have the options of adding tags:

The next step is to configure security groups. Security groups allow us granular filtering in the form of access lists to determine what subnets/IPs/services can communicate with what other subnets/IPs/services and on which ports in our infrastructure thereby providing an added layer of security.

From here we can create a new security group or choose an existing one. I've opted for creating a new security group named sahil-sec-group1. By default ssh access on port 22 is allowed from source of 0.0.0.0/0 allowing all IP addresses to access your instance. I'll let it be since this is a test instance but in a production environment one would sett security group rules to allow access from known IP addresses only.
That was the last configuration item available in the wizard. Now we click on review and launch.
This displays the configuration that we've selected for our instance. We can change any of the configuration items if we feel the need to. If all looks good then click launch.

We are then prompted to create a new key pair and download it. This is an additional security feature. For a Linux AMI the default authentication mechanism is key based instead of password based because a key will be tougher to crack than a password.

Download the private key file and launch the instance.
If all goes well we are presented with the following message on screen:

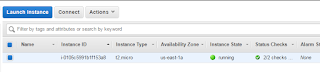
Now we go back to our EC2 dashboard. We see that now we have a running instance, a key pair and a new security group.

Click on running instances to view the status of the launched instance:
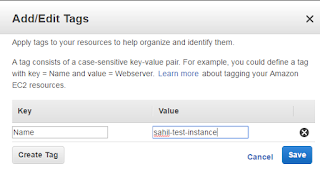
Notice that the name section is blank. We can assign a name to our instance by adding a name tag. We could've done this during the instance configuration wizard bu I wanted to try to do it after the instance is up.
To name our new instance go to actions > instance settings > add/edit tags

This will bring up the following box:


In this article I describe how I launched my first EC2 instance. EC2 (Elastic Compute Cloud) is Amazons' compute/IAAS offering.
I created my account on AWS' website www.aws.amazon.com and opted for the year long free tier subscription.
Once a user logs in they are presented with the below screen:

Once logged in we can choose a among a number of regions where we'd like to spin up our instance.
Let me briefly talk about a couple of terms namely regions, availability zones and edge locations as one would often come across these while learning AWS.
Region: A region is a geographic location where AWS has presence.
Availability zone: This fundamentally represents an AWS data center within a region. A region may have multiple availability zones.
Edge location: An edge location is an entity within a region where we cannot spin up instances but we can consume some of the services offered by AWS. For example, an edge location may be used to house a DNS server.
To view your current region and list out the available regions, expand on the upper right tab next to your name as shown in the below screenshot:

From that I can determine that at present any instances I spin up will be created within the N.Virginia region.
Now click on EC2 and you will be presented with the EC2 dashboard.

If we scroll down to the service health section we can get the health status of the region as well as availability zones within the region. N.Virginia is the oldest region btw and therefore newly launched services are usually made available in this region first.

To create a new instance just click on 'launch instance' button.

The first step is to choose an AMI (Amazon machine image) to launch. We are presented with a number of options and notice that some of the AMIs have 'free tier eligible' written against them. Only those AMIs can be launched under the free tier and remaining would be paid.

I opted for Amazon Linux and so clicked the select button against that option.
Next we are presented with another set of options which are basically compute resource configurations with our free tier eligible option pre-selected for us. From this list we can opt for a paid bigger AMI.

I'll stick to the free tier option. At this point we can review and launch the instance or do some further configuration with it. I selected the second option.
We are then presented with the below screen:

At this juncture we are given a number of options that we can modify as per our requirement. I'll talk about some of these options:
Number of instances is the number of VMs that we'd like to deploy.
Spot instances: This is basically unused capacity available at a discounted price which the customers can bid for. The customer with the highest bid will get that capacity.
VPC(virtual private cloud): This allows us to create a logical network that is isolated from the rest of AWS.
IAM (Identity and access management): This helps us to implement user access/privilege control mechanisms via RBAC or other methods.
We can review and launch the instance of click on add storage. I won't be adding any storage in this article yet I'll click on it.

This shows us our current storage settings, presents us with the option of adding additional storage and also tells us that free tier storage additions are limited to 30GB.
Then in the next step we have the options of adding tags:

The next step is to configure security groups. Security groups allow us granular filtering in the form of access lists to determine what subnets/IPs/services can communicate with what other subnets/IPs/services and on which ports in our infrastructure thereby providing an added layer of security.

From here we can create a new security group or choose an existing one. I've opted for creating a new security group named sahil-sec-group1. By default ssh access on port 22 is allowed from source of 0.0.0.0/0 allowing all IP addresses to access your instance. I'll let it be since this is a test instance but in a production environment one would sett security group rules to allow access from known IP addresses only.
That was the last configuration item available in the wizard. Now we click on review and launch.
This displays the configuration that we've selected for our instance. We can change any of the configuration items if we feel the need to. If all looks good then click launch.

We are then prompted to create a new key pair and download it. This is an additional security feature. For a Linux AMI the default authentication mechanism is key based instead of password based because a key will be tougher to crack than a password.

Download the private key file and launch the instance.
If all goes well we are presented with the following message on screen:

Now we go back to our EC2 dashboard. We see that now we have a running instance, a key pair and a new security group.

Click on running instances to view the status of the launched instance:

Notice that the name section is blank. We can assign a name to our instance by adding a name tag. We could've done this during the instance configuration wizard bu I wanted to try to do it after the instance is up.
To name our new instance go to actions > instance settings > add/edit tags

This will bring up the following box:

Click on create tag. Add the key as name and value as the name that you;d like to assign to your instance and click save.
And now we can see that our instance has been named:

Now we can finally login to our instance. To do so click on connect.

Instead of a straight up login prompt which I expected we are instead given instructions on how to login to our instance using the key pair we generated.
So, I go to my mobaxterm terminal, change the permissions of the key file and run the ssh command as mentioned in the instructions:
──────────────────
[2017-06-05 19:51.01] /home/sahil.suri/Desktop
[sahil.suri.-MLAP-50] ➤ chmod 400 sahil-test-key.pem
✔
──────────────────
[2017-06-05 19:51.10] /home/sahil.suri/Desktop
[sahil.suri.-MLAP-50] ➤ ls -l sahil-test-key.pem
-r-------- 1 Administ UsersGrp 1692 Jun 5 19:10 sahil-test-key.pem
✔
──────────────────
[2017-06-05 19:51.11] /home/sahil.suri/Desktop
[sahil.suri.-MLAP-50] ➤ ssh -i "sahil-test-key.pem" ec2-user@ec2-34-203-227-36.compute-1.amazonaws.com
Warning: Permanently added 'ec2-34-203-227-36.compute-1.amazonaws.com' (RSA) to the list of known hosts.
X11 forwarding request failed on channel 0
__| __|_ )
_| ( / Amazon Linux AMI
___|\___|___|
https://aws.amazon.com/amazon-linux-ami/2017.03-release-notes/
7 package(s) needed for security, out of 11 available
Run "sudo yum update" to apply all updates.
[ec2-user@ip-172-31-69-135 ~]$ uname -a
Linux ip-172-31-69-135 4.9.20-11.31.amzn1.x86_64 #1 SMP Thu Apr 13 01:53:57 UTC 2017 x86_64 x86_64 x86_64 GNU/Linux
[ec2-user@ip-172-31-69-135 ~]$ date
Mon Jun 5 14:21:56 UTC 2017
[ec2-user@ip-172-31-69-135 ~]$ uptime
14:21:58 up 40 min, 1 user, load average: 0.00, 0.00, 0.00
And that's it. We are logged in finally.
What if we don't want to use key based authentication. We may need to access our ec2 instance from a system where we haven't stored our key file.
Here is a workaround:
The ec2-user user has been granted root access by default. So you can switch to root and do the following to allow for password based logins.
Add a user :
[ec2-user@ip-172-31-69-135 ~]$ sudo su -
[root@ip-172-31-69-135 ~]#
[root@ip-172-31-69-135 ~]# useradd sahil
[root@ip-172-31-69-135 ~]# passwd sahil
Give sudo access to the new user.
[root@ip-172-31-69-135 ~]# grep sahil /etc/sudoers
sahil ALL=(ALL) NOPASSWD: ALL
[root@ip-172-31-69-135 ~]#
Enable password based authentication in /etc/ssh/sshd_config file:
[root@ip-172-31-69-135 ~]# grep -i password /etc/ssh/sshd_config
# To disable tunneled clear text passwords, change to no here!
PasswordAuthentication yes
Restart the sshd service:
[root@ip-172-31-69-135 ~]# service sshd restart
Stopping sshd: [ OK ]
Starting sshd: [ OK ]
Login as new user and check access level:
[sahil.suri.-MLAP-50] ➤ ssh sahil@ec2-34-203-227-36.compute-1.amazonaws.com
sahil@ec2-34-203-227-36.compute-1.amazonaws.com's password:
X11 forwarding request failed on channel 0
Last login: Mon Jun 5 14:36:43 2017 from 117.220.177.71
__| __|_ )
_| ( / Amazon Linux AMI
___|\___|___|
https://aws.amazon.com/amazon-linux-ami/2017.03-release-notes/
7 package(s) needed for security, out of 11 available
Run "sudo yum update" to apply all updates.
[sahil@ip-172-31-69-135 ~]$ sudo -l
Matching Defaults entries for sahil on this host:
!visiblepw, always_set_home, env_reset, env_keep="COLORS DISPLAY HOSTNAME HISTSIZE INPUTRC KDEDIR LS_COLORS", env_keep+="MAIL
PS1 PS2 QTDIR USERNAME LANG LC_ADDRESS LC_CTYPE", env_keep+="LC_COLLATE LC_IDENTIFICATION LC_MEASUREMENT LC_MESSAGES",
env_keep+="LC_MONETARY LC_NAME LC_NUMERIC LC_PAPER LC_TELEPHONE", env_keep+="LC_TIME LC_ALL LANGUAGE LINGUAS _XKB_CHARSET
XAUTHORITY", secure_path=/sbin\:/bin\:/usr/sbin\:/usr/bin
User sahil may run the following commands on this host:
(ALL) NOPASSWD: ALL
[sahil@ip-172-31-69-135 ~]$ sudo su -
Last login: Mon Jun 5 14:36:46 UTC 2017 on pts/1
[root@ip-172-31-69-135 ~]# whoami;uname -a;date
root
Linux ip-172-31-69-135 4.9.20-11.31.amzn1.x86_64 #1 SMP Thu Apr 13 01:53:57 UTC 2017 x86_64 x86_64 x86_64 GNU/Linux
Mon Jun 5 14:41:48 UTC 2017
[root@ip-172-31-69-135 ~]#
This is an easy way to access the AMI but keep in mind that we are compromising security over convenience.
Now that we've created a new instance and had some fun it's time to terminate it.
To terminate the new instance go to actions > instance state > terminate.
I'd like to mention here that a stopped instance does not stop getting billed. The billing for an instance stops only when it gets terminated.
I'd like to mention here that a stopped instance does not stop getting billed. The billing for an instance stops only when it gets terminated.

You will be prompted if you are sure that you would like to go ahead with the removal of the instance along with the storage attached to it. Click yes to continue.

It takes a couple to minutes for the instance to completely be vanished. If you go the running instances dashboard you will see the instance state as terminated and it'll vanish in a while:


I hope this article has been informative for you.


Thanks for providing your information. get more updates on AWS go through AWS Online Course
ReplyDelete