Route 53 is a worldwide distributed DNS service provided by AWS and is cleverly named since the default udp port for DNS is 53. This service has an impressive SLA of 100% and has a presence in every AWS region and edge location. An interesting feature of Route 53 is its ability to perform health checks wherein it can take can monitor an endpoint and take the IP address out of rotation if it does not receive a response for a set time interval.
Route 53 provides the following routing policies:
Single:
With this routing policy we can have a record and associate it with one or more IP addresses. This is the simplest routing policy available.
Weighted:
This is similar to single but in weighted routing policy we can assign a number or a weight to an IP address. The number being assigned is relative to the total wight being assigned to the IPs. For example for a web server , we can give 1 IP address a weight of 30 and another one a weight of 70. So this would translate to 70% of the requests being catered by one server and 30% of the requests being catered by the other server.
Latency:
For a user connecting to a URL with multiple IP addresses on multiple servers, the latency routing policy will connect the user to the server with the least latency.
Failover:
This routing policy provides health checks and failover capabilities.
Geolocation:
For an application available in multiple languages and being accessed by users from different nationalities, the geolocation routing policy will detect an application access request from a user from a particular country and forward that request to a server on which the application is available in the country's native language.
The Route 53 dashboard and quick demo:
Now I'll do a quick walk through of the Route 53 dashboard and explain in brief how we may go about implementing the different routing policies.
To get to the Route 53 dashboard click on route 53 under network and content delivery in the AWS services dashboard.


Next we have the section on hosted zones. A hosted zone is a collection of resource record sets for a specified domain. You create a hosted zone for a domain (such as example.com), and then you create resource record sets to tell the Domain Name System how you want traffic to be routed for that domain.

The creation of a hosted zone is pretty straightforward. Under the hosted zones section click on create hosted zone.
We then specify the domain name and if it is a public hosted zone and click create.

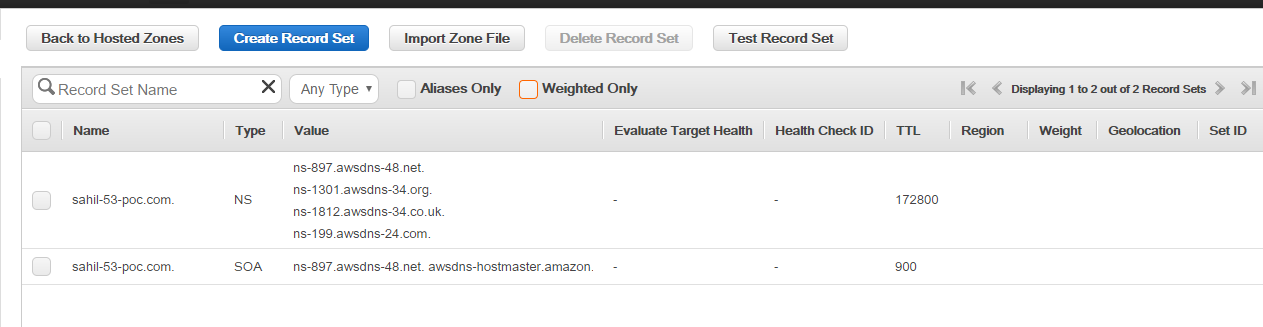
By default when we create a new hosted zone Route 53 creates the Name Server (NS) and Start of Authority (SOA) records for us as shown below:

If we want to use our own then we do so by clicking on import zone file. The data in the file should be in a specified format.
To create a new record click on create record set and feed the information depending on the type of record. For example, I'm creating an A record in the below screenshot.

We need to specify the record name, type of the record, value i.e. the IP address in case of an A record and finally select the routing policy.
While creating the last A record I selected the simple routing policy. Now I'll add a record using the weighted routing policy.

As soon as I selected the weighted routing policy I was asked to enter the weight and an identifier. The weight is relative to the total number. At present I've added a record named weight and specified the weight value to 70. Now if I don't specify another record set with the same name i.e. weight and a weight of 30 or another arbitrary number then the traffic will not be distributed because 70 is 100% of the number 70 so the entire traffic still gets routed to the first record.
To use the latency routing policy we'll need to create two or more record sets with the record name but with different IP addresses and the latency routing policy selected.

Now if we use the latency routing policy then we are asked to select a region to host that particular record set in as shown in the above screenshot. The routing and latency calculation is done by AWS in the background and routes users to locations with least latency from their origin.
If we select the failover routing policy, we'll have to specify if the current record is the primary or the secondary and associate it with a health check.

I haven't configured any health checks yet but we can do so by clicking on health checks within the Route 53 dashboard. The below screen will be displayed.

We can supply our requirements here, save it and associate it with the failover routing policy when we are creating the record set.
Finally if we need to create a record set using the geolocation routing policy then we select geolocation from the routing policy drop down list and specify a location for the record set.

Route 53 provides the following routing policies:
Single:
With this routing policy we can have a record and associate it with one or more IP addresses. This is the simplest routing policy available.
Weighted:
This is similar to single but in weighted routing policy we can assign a number or a weight to an IP address. The number being assigned is relative to the total wight being assigned to the IPs. For example for a web server , we can give 1 IP address a weight of 30 and another one a weight of 70. So this would translate to 70% of the requests being catered by one server and 30% of the requests being catered by the other server.
Latency:
For a user connecting to a URL with multiple IP addresses on multiple servers, the latency routing policy will connect the user to the server with the least latency.
Failover:
This routing policy provides health checks and failover capabilities.
Geolocation:
For an application available in multiple languages and being accessed by users from different nationalities, the geolocation routing policy will detect an application access request from a user from a particular country and forward that request to a server on which the application is available in the country's native language.
The Route 53 dashboard and quick demo:
Now I'll do a quick walk through of the Route 53 dashboard and explain in brief how we may go about implementing the different routing policies.
To get to the Route 53 dashboard click on route 53 under network and content delivery in the AWS services dashboard.

We can transfer domains into and out of route 53 and the status of any such requests is displayed in the pending requests section.
If you have any domains registered with AWS then they show up in the registered domains section.
From here we can initiate a domain transfer by clicking on the transfer domain button and following the required process.
Next we have the section on hosted zones. A hosted zone is a collection of resource record sets for a specified domain. You create a hosted zone for a domain (such as example.com), and then you create resource record sets to tell the Domain Name System how you want traffic to be routed for that domain.

The creation of a hosted zone is pretty straightforward. Under the hosted zones section click on create hosted zone.
We then specify the domain name and if it is a public hosted zone and click create.

By default when we create a new hosted zone Route 53 creates the Name Server (NS) and Start of Authority (SOA) records for us as shown below:
If we want to use our own then we do so by clicking on import zone file. The data in the file should be in a specified format.
To create a new record click on create record set and feed the information depending on the type of record. For example, I'm creating an A record in the below screenshot.

We need to specify the record name, type of the record, value i.e. the IP address in case of an A record and finally select the routing policy.
While creating the last A record I selected the simple routing policy. Now I'll add a record using the weighted routing policy.

As soon as I selected the weighted routing policy I was asked to enter the weight and an identifier. The weight is relative to the total number. At present I've added a record named weight and specified the weight value to 70. Now if I don't specify another record set with the same name i.e. weight and a weight of 30 or another arbitrary number then the traffic will not be distributed because 70 is 100% of the number 70 so the entire traffic still gets routed to the first record.
To use the latency routing policy we'll need to create two or more record sets with the record name but with different IP addresses and the latency routing policy selected.

Now if we use the latency routing policy then we are asked to select a region to host that particular record set in as shown in the above screenshot. The routing and latency calculation is done by AWS in the background and routes users to locations with least latency from their origin.
If we select the failover routing policy, we'll have to specify if the current record is the primary or the secondary and associate it with a health check.

I haven't configured any health checks yet but we can do so by clicking on health checks within the Route 53 dashboard. The below screen will be displayed.

We can supply our requirements here, save it and associate it with the failover routing policy when we are creating the record set.
Finally if we need to create a record set using the geolocation routing policy then we select geolocation from the routing policy drop down list and specify a location for the record set.


Really enjoyed while reading your article, the information you have delivered in this post was damn good. Keep sharing your post with informative content. AWS Online Training Bangalore
ReplyDelete