Showing posts with label VMware. Show all posts

Wednesday, 6 July 2016

Powering on a virtual machine to BIOS in VMware Workstation & Vsphere 5.5

Sometimes we may run into a situation wherein we need to go the BIOS of the virtual machine.
One such scenario could be if you are trying to boot the VM in rescue mode from an ISO & you need to modify the boot order of devices to be used for boot.
To boot the VM to the BIOS perform the following steps:
  1. Right click on the VM & hover the mouse to the VM to the power option.
  2. You'll now see the available options. From there click on 'Power On to firmware' & you are done.
Given below is a screen shot to illustrate the same:


To force a VM to boot to the BIOS screen in Vsphere do the following:


  1. Open up the Vpshere web client. Right click the VM & go to edit settings & select VM options.
  2. From there you'll see a check box "The next time the system boots, force entry into BIOS screen".
  3. Mark that check box & enter a boot delay value of a couple of seconds & that's it.


Here is a screen shot to illustrate:


Monday, 13 June 2016

Fixing vsphere web client start up due flash player issues

Sometimes vpshere web client may not start after an installation.
This can be caused due to a variety of reasons but the cause discussed here is non-start up due to problems with adobe flash player.


This particular case happened due to an outdated version of adobe flash player.

The default install had version 11.3 but for vsphere web client to function correctly we need a version that is 11.5 or greater.

The solution was to install the latest version of adobe flash player.

Installing Vcenter 5.5


In order to centrally manage ESXi hosts we use Vcenter software. It is available in a variety of editions depending on additional features.

The installation pre-requisites can be found on VMwares' website.

In this lab we are installing Vcenter server 5.5 on a Windows server 2012.

To start load the installation media in the CD/DVD drive.


Navigate to the drive & double click on autorun:


This will bring up the installation wizard. From there click install


The wizard will install the following components:

  • Single sign on
  • Web client
  • Vcenter inventory service
  • Vcenter server

Click next to proceed with the installation.


Confirm details & continue.


During the installation we'll see the following message stating that the "script is taking too long". Ignore that message.


On the next prompt enter a license key if one is available. If we do not enter a license key then post install Vsphere will continue to operate in evaluation mode.


In this install we'll use the embedded SQL Server Express 2008 addition to serve as the database component.


Enter the account to be used for running Vcenter services:


The next prompt specifies the port numbers Vsphere will use after it gets installed. Change any port numbers as needed.


In this prompt specify memory to be used by JVM depending on size of deployment:


We'll see the following prompts once installation completes successfully.


Enabling NTP on ESXi

Login to the ESXi host from the Vsphere web client & click on the configuration tab.
Now from the Software menu click on time settings. You will see the following display:


To enable NTP, click on properties tab from the top right corner. The following box appears on screen. Check mark the ‘NTP client enabled’ box to enable NTP & then click on options to add NTP servers:


Under NTP settings click on add & a box will appear where you can enter the address of the NTP server. Enter the address & press ok. Check mark ‘restart NTP’ & click on ‘ok’ under the NTP settings for the changes to take effect.


Changing hostname of an ESXi host


Obtain the Direct Console User Interface (DCUI) prompt. Press F2 to enter the system customization menu. You will be asked to enter the root password after which the following display appears:


Select Configure Management Network option. The present configuration is displayed on the right side of the screen. Press enter to edit the network configuration.

Scroll down to DNS configuration & you can see the details on the right side of the screen.


Press enter to go ahead & edit the configuration:


From there go the hostname option & type the new hostname & press enter:


After that you will land at the configure management network prompt again. Press ESC here. Now you will be prompted with the following message:


Entering yes at the above prompt will restart the management network & this will cause a brief network outage for a couple of seconds.

Installing ESXi 5.5:


For this lab setup I’m using VMware workstation 11. To install ESX on a physical server you can attach the iso to the system via a virtual cd rom drive through the servers’ out of band management interface (console).

Launch VMware workstation & click on create new VM. Browse to the path for the ESXi iso & click next:


Follow the Wizard & click finish once done. When the VM comes up you should see the following prompt on screen:


Press enter to continue. Some service start-ups will commence now & you will see the following output on screen:


After a few minutes the following prompt is displayed. Press enter to start with the installation.


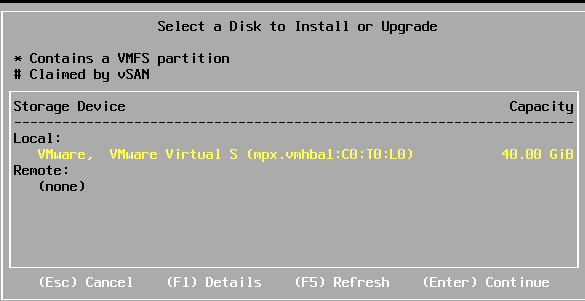
Now you will see a screen asking you to select the disk on which ESXI will be installed.
Select the appropriate disk & press enter:


After this you will be asked to select a keyboard layout & enter root password for the host. Post this you will see the below prompt stating that the disk will be repartitioned. Press f11 to start the installation.


If the installation is successful the following screen is displayed. Press enter to reboot the newly installed ESXi server (as a VM):


Using capture groups in grep in Linux

Introduction Let me start by saying that this article isn't about capture groups in grep per se. What we are going to do here with gr...