A VPC allowed us to create an isolated network for our own use within the AWS cloud. We can create a VPC via two methods. One is via the VPC wizard and the second is manual. The wizard based method is relatively easy because it goes ahead and creates subnets, routing tables, internet gateway, security groups and NACLs for us while in the manual method only the VPC component is created and we need to create everything else manually.
In this article I'll describe creation of a VPC via the wizard based method and also how we'd associate a VPC with an instance.
To create a VPC go to the AWS services dashboard and under Networking and Content Delivery section click on VPC. This will bring up the VPC dashboard.

From here click on Start VPC Wizard. Now we will be prompted to select our required VPC configuration:
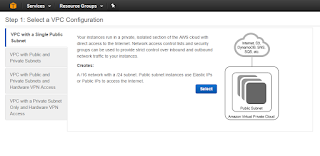 For the sake of demonstration, we'll go with the simplest option i.e. the first one "VPC with a single public subnet". The description here is a bit confusing because although it says a single public subnet but no elastic/public IP addresses get allocated to the VPC at creation time. Click on select.
In the next screen we can populate our VPC settings:

AWS allows a CIDR range of 16 up to 28 for subnets. AWS reserves 5 addresses within a given sybnet for it's services.
Each subnet can span a single availability zone and we can specify that.We will check mark enable DNS hostnames. The name resolution is performed by AWS route 53 service. We'll keep hardware tenancy at default which is shared. We can opt for dedicated hardware but that'll cost more obviously.
Click on create vpc after populating your specifications.
If all goes well we are presented with the below message:
 Click on ok and we'll be brought back to our VPC dashboard where we can see that our VPC has been created successfully:

Under the VPC dashboard we can click on Subnets to view our available subnets:

Similarly below the subnets we can click on routing tables to view the routing table for our subnet.

The routing table is telling us that all traffic within the VPC i.e. the large CIDR 192.168.0.0/16 is local and everything else will be dumped to the internet gateway. I might talk about the internet gateway in detail in a later article. But as of now we'll just view the internet gateway details by clicking on the internet gateways section within the VPC dashboard.

Assigning elastic IP addresses:
With the VPC configuration complete I've gone ahead and created an instance with this VPC via mentioning the following details in the instance configuration section.

Notice that I've set the auto assignment of a public IP address to disabled. Now here is the EC2 dashboard view after I launched the instance.

Notice that it only has a private IP address and no public IP address is given.
So, now let's assign an elastic IP address.
In the EC2 dashboard, towards the left go to Network & Security section and click on Elastic IPs.
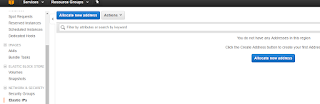
This shows us that we currently don't have any elastic IP addresses. So let's click on Allocate new address to get one.

So, now we have an elastic IP address but it's not associated with any instance. Now go to actions and click on associate address.

Enter the name of the instance and its private IP address and click on associate.

We can now see that our elastic IP is associated with the private IP address of the EC2 instance that we just created.
Now let's check the instance details under the EC2 dashboard

And wow! Our instance now has a public DNS name and a public IPv4 address associated with it.
Before I wrap up the article I'd like to draw your attention to one more entity here and that is the network interface. We can view the details of the network interface attached to this instance by clicking on the network interfaces within the Network and Security section of the EC2 dashboard.

The reason i wanted to highlight is that in the case of an instance failure we can detach this elastic network interface from the affected instance and add it to another running instance.
In this article I'll describe creation of a VPC via the wizard based method and also how we'd associate a VPC with an instance.
To create a VPC go to the AWS services dashboard and under Networking and Content Delivery section click on VPC. This will bring up the VPC dashboard.

From here click on Start VPC Wizard. Now we will be prompted to select our required VPC configuration:

In the next screen we can populate our VPC settings:

AWS allows a CIDR range of 16 up to 28 for subnets. AWS reserves 5 addresses within a given sybnet for it's services.
Each subnet can span a single availability zone and we can specify that.We will check mark enable DNS hostnames. The name resolution is performed by AWS route 53 service. We'll keep hardware tenancy at default which is shared. We can opt for dedicated hardware but that'll cost more obviously.
Click on create vpc after populating your specifications.
If all goes well we are presented with the below message:

Under the VPC dashboard we can click on Subnets to view our available subnets:

Similarly below the subnets we can click on routing tables to view the routing table for our subnet.

The routing table is telling us that all traffic within the VPC i.e. the large CIDR 192.168.0.0/16 is local and everything else will be dumped to the internet gateway. I might talk about the internet gateway in detail in a later article. But as of now we'll just view the internet gateway details by clicking on the internet gateways section within the VPC dashboard.

Assigning elastic IP addresses:
With the VPC configuration complete I've gone ahead and created an instance with this VPC via mentioning the following details in the instance configuration section.

Notice that I've set the auto assignment of a public IP address to disabled. Now here is the EC2 dashboard view after I launched the instance.

Notice that it only has a private IP address and no public IP address is given.
So, now let's assign an elastic IP address.
In the EC2 dashboard, towards the left go to Network & Security section and click on Elastic IPs.

This shows us that we currently don't have any elastic IP addresses. So let's click on Allocate new address to get one.

So, now we have an elastic IP address but it's not associated with any instance. Now go to actions and click on associate address.

Enter the name of the instance and its private IP address and click on associate.
We can now see that our elastic IP is associated with the private IP address of the EC2 instance that we just created.
Now let's check the instance details under the EC2 dashboard
And wow! Our instance now has a public DNS name and a public IPv4 address associated with it.
Before I wrap up the article I'd like to draw your attention to one more entity here and that is the network interface. We can view the details of the network interface attached to this instance by clicking on the network interfaces within the Network and Security section of the EC2 dashboard.
The reason i wanted to highlight is that in the case of an instance failure we can detach this elastic network interface from the affected instance and add it to another running instance.

Nice article provided by you keep sharing AWS Online Course
ReplyDeleteGood Post. I like your blog. Thanks for Sharing
ReplyDeleteAWS Training in Delhi
It is very useful for me to learn and understand easily.
ReplyDeleteAWS Training in Delhi
AWS Training institute in Delhi
Thanks for sharing this Informative content. Well explained. Got to learn new things from your Blog on aws.
ReplyDeleteAWS Training In Hyderabad
AWS Training
AWS Online Training
AWS Training Online
AWS Training In Bangalore
worthwhile post useful for everyone.Keep on sharing
ReplyDeleteGoogle Cloud Platform Training
GCP Online Training
Google Cloud Platform Training In Hyderabad
Thanks for sharing, nice blog.
ReplyDeleteAWS Training in Hyderabad
Best AWS Training in Hyderabad
Great blog!! Thanks for sharing
ReplyDeleteAWS Online Training
AWS Training
AWS certification training
Thank you for your valuable content , Easy to understand and follow. As said, the migration to cloud is very essential for the protection of the database.Cloud Migration Services
ReplyDelete