Monday, 19 June 2017

Introduction to Route 53

Route 53 is a worldwide distributed DNS service provided by AWS and is cleverly named since the default udp port for DNS is 53. This service has an impressive SLA of 100% and has a presence in every AWS region and edge location. An interesting feature of Route 53 is its ability to perform health checks wherein it can take can monitor an endpoint and take the IP address out of rotation if it does not receive a response for a set time interval.


Route 53 provides the following routing policies:

Single:
With this routing policy we can have a record and associate it with one or more IP addresses. This is the simplest routing policy available.

Weighted:
This is similar to single but in weighted routing policy we can assign a number or a weight to an IP address. The number being assigned is relative to the total wight being assigned to the IPs. For example for a web server , we can give 1 IP address a weight of 30 and another one a weight of 70. So this would translate to 70% of the requests being catered by one server and 30% of the requests being catered by the other server.

Latency:
For a user connecting to a URL with multiple IP addresses on multiple servers, the latency routing policy will connect the user to the server with the least latency.

Failover:
This routing policy provides health checks and failover capabilities.

Geolocation:
For an application available in multiple languages and being accessed by users from different nationalities, the geolocation routing policy will detect an application access request from a user from a particular country and forward that request to a server on which the application is available in the country's native language.


The Route 53 dashboard and quick demo:

Now I'll do a quick walk through of the Route 53 dashboard and explain in brief how we may go about implementing the different routing policies.

To get to the Route 53 dashboard click on route 53 under network and content delivery in the AWS services dashboard.


We can transfer domains into and out of route 53 and the status of any such requests is displayed in the pending requests section.
If you have any domains registered with AWS then they show up in the registered domains section. 
From here we can initiate a domain transfer by clicking on the transfer domain button and following the required process.


Next we have the section on hosted zones. A hosted zone is a collection of resource record sets for a specified domain. You create a hosted zone for a domain (such as example.com), and then you create resource record sets to tell the Domain Name System how you want traffic to be routed for that domain.


The creation of a hosted zone is pretty straightforward. Under the hosted zones section click on create hosted zone.

We then specify the domain name and if it is a public hosted zone and click create.


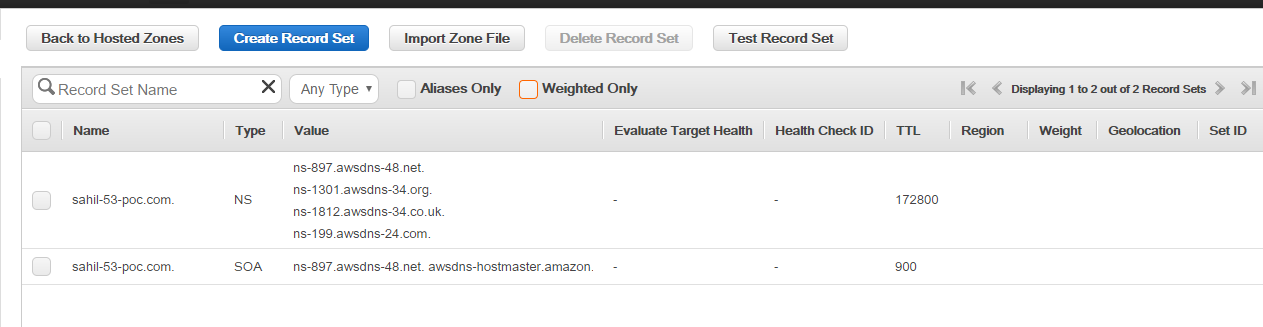
By default when we create a new hosted zone Route 53 creates the Name Server (NS) and Start of Authority (SOA) records for us as shown below:

If we want to use our own then we do so by clicking on import zone file. The data in the file should be in a specified format.

To create a new record click on create record set and feed the information depending on the type of record. For example, I'm creating an A record in the below screenshot.


We need to specify the record name, type of the record, value i.e. the IP address in case of an A record and finally select the routing policy.

While creating the last A record I selected the simple routing policy. Now I'll add a record using the weighted routing policy.


As soon as I selected the weighted routing policy I was asked to enter the weight and an identifier. The weight is relative to the total number. At present I've added a record named weight and specified the weight value to 70. Now if I don't specify another record set with the same name i.e. weight and a weight of 30 or another arbitrary number then the traffic will not be distributed because 70 is 100% of the number 70 so the entire traffic still gets routed to the first record.


To use the latency routing policy we'll need to create two or more record sets with the record name but with different IP addresses and the latency routing policy selected.


Now if we use the latency routing policy then we are asked to select a region to host that particular record set in as shown in the above screenshot. The routing and latency calculation is done by AWS in the background and routes users to locations with least latency from their origin.


If we select the failover routing policy, we'll have to specify if the current record is the primary or the secondary and associate it with a health check.


I haven't configured any health checks yet but we can do so by clicking on health checks within the Route 53 dashboard. The below screen will be displayed.


We can supply our requirements here, save it and associate it with the failover routing policy when we are creating the record set.


Finally if we need to create a record set using the geolocation routing policy then we select geolocation from the routing policy drop down list and specify a location for the record set.


Configuring autoscaling in AWS

Autoscaling represents the concept of elasticity in the AWS cloud infrastructure.

Here are some of its major features:

  • Autoscaling allows the user to grow or shrink the AWS compute infrastructure based on a set of metrics.
  • We can use bootstraping or dynamic configuration of our EC2 instances using configuration management tools like chef and powershell scripts to configure our instances according to our requirement while they are being deployed.
  • Autoscaling can be integrated with CloudWatch monitoring to trigger launch or termination of EC2 instances if a metric is above or below a defined threshold. We can also configure autoscaling to schedule the launch and termination of instances during a particular time window.
  • Notification services like SNS or SQS can be integrated with autoscaling. For example if SQS detects that number of messages in a queue exceed a certain amount then deploy more EC2 instances.
  • Last but definitely not the least, autoscaling is a free service.


To create an autoscaling group, click on autoscaling groups within the autoscaling menu under the EC2 dashboard.


This brings up the below screen:


Click on create autoscaling group.

The first step in creating an autoscaling group is to create a launch configuration.


The launch configuration is the foundation AMI we'll use to create instances. Click on create launch configuration.

This will bring the list of available AMI options similar to what we see when we deploy a stand alone on demand EC2 instance.

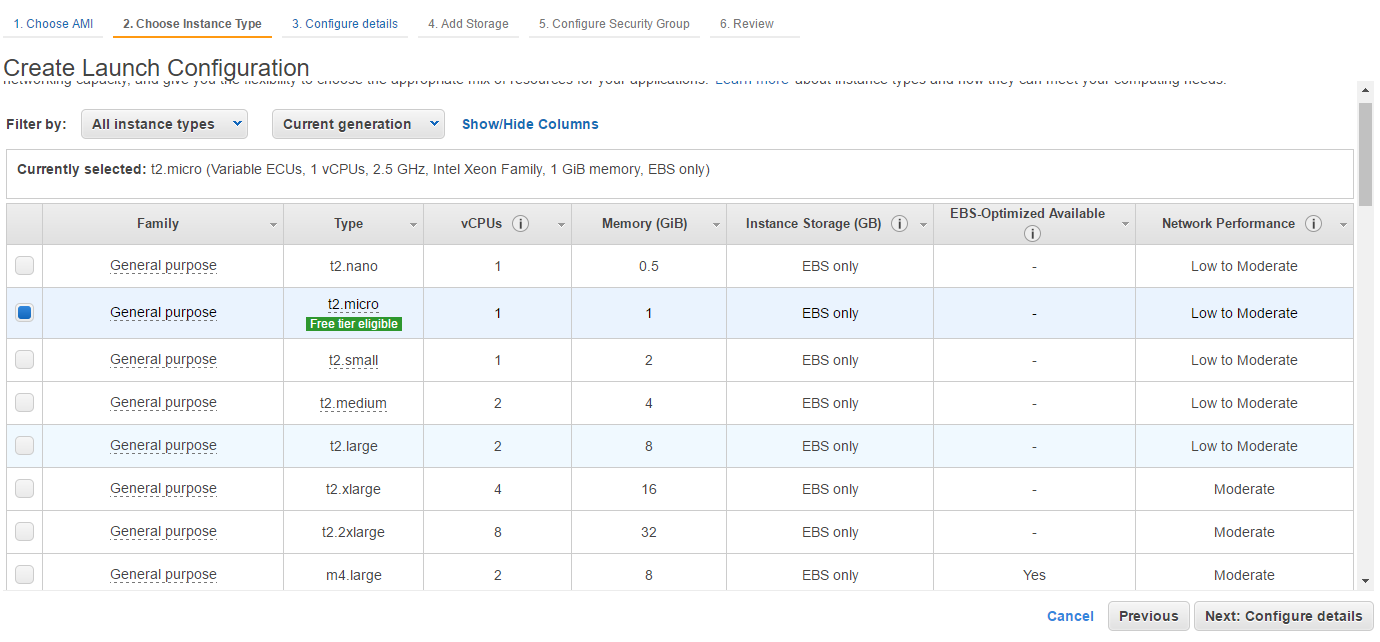
From the available option I've selected the Amazon Linux AMI and in the next screen I've selected the free tier instance. Once the type of instance is selected click on configure details.


In the configure details section we will set a name for our launch configuration. We can optionally request for spot instances and enable cloudwatch monitoring. On expanding the advanced details section we can see that we have the option of enabling or disabling the assignation of elastic IPs to the instances that get deployed using this launch configuration.
The user data field is particularly interesting because here we can add our bootstrap scripts o be applied to the instances being launched.


In the preceding sections we can modify the storage allocation to the instances and apply security group memberships against them. I've kept these settings at defaults. Finally we are presented with the below review screen.


Now click on create launch configuration. This will prompt us for selecting the key pairs we'd like to use to authenticate against the instances.


I've selected a key pair that I had created earlier.

Once the launch configuration gets created we'll be dropped to the autoscaling group creation wizard.

Here we give the autoscaling group a name and supply networking information. Under the advanced details section I've integrated an ELB I had created earlier with this autoscaling group and specified that I'd like ELB to do the health checks every 5 minutes.

In the next section we configure scaling policies which allow us to define conditions to grow or shrink the number of EC2 instances in a granular fashion.
We need to create alarms or triggers to scale up and scale down.

First under the Increase group size section we'll click on Add New Alarm.


Here we define a trigger saying that when the average CPU utilization is greater than 80% for 1 consecutive period of 5 minutes, add another EC2 instance.

If we want to take additional steps/actions in this scaling policy we can click on add step and specify the action. For example I've specified that I'd like another instance to be launched if the CPU utilization exceeds 90%.

Similarly we define an alarm for shrinking the environment when the traffic or load drops.


So, now we have our scaling policies ready.


We can configure notifications and add tags to our autoscaling group but I've skipped them for the sake of this demonstration.

Finally we can review our selections and once satisfied click on create autoscaling group.


The following page indicates successful creation.


Click on view autoscaling groups to view the status of the group we just created.


I would like to mention here that the creation of an autoscaling group might fail due to limitations set on user accounts by AWS.

Saturday, 17 June 2017

Bash script to update rows in a table in a MS word file

In this article I'll explore something I thought for a long time could not be done correctly. I'll update a MS word document in Linux using a shell script without  the use of open office or any other similar software. A MS word document is essentially composed of a bunch of compressed XML file and some other data. We can uncompress the doc file in Linux via zip to obtain the XML file and also extract the text from that XML file using sed. But inserting text into a word document is a whole different story altogether.

The scenario I'm about to demonstrate is that I have a word file with a table in it and update the rows in the table.

Given below is the screenshot of the document content.


Now I wish to update each cell in the entire row and given below is the script to do it.

#!/bin/bash

echo "enter absolute path of MS WORD .docx file"

read DOC_LOCATION

DOC_FILE=$(echo $DOC_LOCATION |  awk -F/ '{print $NF}')

cp ${DOC_LOCATION} /tmp/XML

cd /tmp/XML

unzip ${DOC_FILE} >> /dev/null

cd /tmp/XML/word

cp document.xml /tmp/append

cd /tmp/append

echo "Enter user name that was created:"
read USER

echo "Enter ticket number:"
read TNO

echo "Enter Approver name:"
read APP

echo "Enter your full name"
read ADMIN

sed -e "s#USERNAME#${USER}#" -e "s#TICKET#${TNO}#" -e "s#APPROVER#${APP}#" -e "s#UNIX#${ADMIN}#" text2insert > text2add

sed -i "s#</w:tr></w:tbl>#</w:tr>$(cat text2add)</w:tbl>#" document.xml

mv -f document.xml /tmp/XML/word

cd /tmp/XML/

rm -f ${DOC_FILE}
zip -r ${DOC_FILE} * >> /dev/null

echo "updated document is available at location /tmp/XML/"


The logic used within the script uses a file named text2insert with XML tags corresponding to a row with arbitrary/default text values inserted in the tags. 
When the script is run the user is prompted to enter some input values. Based on the received inputs the text file text2insert is modified and the updated file text2add is created.

The content of text2add file is inserted into the word document XML file in between the closure the last row tag and the closure of the table tag thereby inserting an entire row of text.

Here is the text within text2insert file.

[root@cent7 append]# cat text2insert
<w:tr><w:tc><w:tcPr><w:tcW w:type="dxa"/></w:tcPr><w:p ><w:r><w:t>USERNAME</w:t></w:r></w:p></w:tc><w:tc><w:tcPr><w:tcW w:type="dxa"/></w:tcPr><w:p ><w:r><w:t>TICKET</w:t></w:r></w:p></w:tc><w:tc><w:tcPr><w:tcW w:type="dxa"/></w:tcPr><w:p ><w:r><w:t>APPROVER</w:t></w:r></w:p></w:tc><w:tc><w:tcPr><w:tcW w:type="dxa"/></w:tcPr><w:p ><w:r><w:t>UNIX</w:t></w:r></w:p></w:tc></w:tr>


This is a screenshot of a run of the script:


After the script completes execution the content of text2add is as follows:

root@cent7 append]# cat text2add
<w:tr><w:tc><w:tcPr><w:tcW w:type="dxa"/></w:tcPr><w:p ><w:r><w:t>forth</w:t></w:r></w:p></w:tc><w:tc><w:tcPr><w:tcW w:type="dxa"/></w:tcPr><w:p ><w:r><w:t>Q779911</w:t></w:r></w:p></w:tc><w:tc><w:tcPr><w:tcW w:type="dxa"/></w:tcPr><w:p ><w:r><w:t>The TSM</w:t></w:r></w:p></w:tc><w:tc><w:tcPr><w:tcW w:type="dxa"/></w:tcPr><w:p ><w:r><w:t>Sahil Suri</w:t></w:r></w:p></w:tc></w:tr>


The script will not create a new document after adding the new row. Instead I performed an in place edit with sed to update the original document.

After running the script, the updated document looks like this:


I hope that this has been an intuitive read and reinforces the philosophy that when there is a shell there is a way.

Wednesday, 14 June 2017

Creating an Elastic Load Balancer (ELB)

The Elastic Load Balencer is a PaaS load balencer available in AWS. Before configuring it let's briefly touch upon its characteristics.


  1. The ELB is a region wide load balancer. It's a Paas or fully managed service meaning that AWS is responsible for all the high availability/redundancy requirements for the ELB and it's made available to us as a service that we can use. 
  2. ELB can load balance across different availability zones within the same region. It can be used internally or externally i.e. we can use it to load balance instances that are internet facing as well as those instances which are isolated from the internet. So the load balancer can have an elastic IP address to make it publicly accessible over the internet or it may have a private IP address. 
  3. It has the capability to perform SSL termination and processing and take some load off of the instances.
  4. It provides a feature called cookie based sticky sessions. It allows a configuration wherein a user connecting to a particular instance via a browser is always connected to the same instance.
  5. It is tightly integrated with auto scaling. So if ELB pulls out a server from rotation then auto scaling can detect it and provision another instance.
  6. ELB also provides health checks and provides advanced health features. For example, we can check for a web page to load successfully on an instance. If the page does not load successfully a certain number of times within a stipulated time period then take the instance out from the load balecer. It also integrates with cloudwatch monitoring.


Now lets configure an ELB.

From the management console point to EC2 and under load baelcing select load balencers.


From here click on create load balencer.


Now we get to defining the load balencer. Specify a name for the ELB and select the VPC in which you want to create the ELB. If you do not want the load balencer to be internet facing then check mark 'create an internal load balencer'.
Next we get to listener configuration. The load balencer port/protocol specifies what the load balencer should be listening for when users try to connect to it. Here we can specify HTTP, HTTPS, SSL or a custom TCP port. If we specify SSL then we'll also have to provide a SSL certificate at one point during the configuration. The default is HTTP port 80. The instance protocol/port specifies where the load balencer will forward the received traffic. Next we specify the subnets for instances where the ELB will route traffic.


After making the required selections, click on next:Assign security groups.

Now we get to apply a security group to our ELB. We can create a new SG or apply an existing one like I've done here.


Next we get to configure our health check parameters.


The ping protocol and the ping port are what the ELB listens on from the instances to ascertain their health. The ping path is web page available on the instances which must be loaded successfully by the instance to confirm that it's healthy.
Let's go through the advanced details section now.
The response timeout defines how quickly the instance must respond before being deemed unhealthy.
The interval is the time interval between consecutive health checks.
Unhealthy threshold is the number of health checks the instance must fail before being taken out of rotation by the ELB.
The healthy threshold is the number of health checks the instance must respond to before being deemed healthy and brought back into rotation.

Next we add instances to our ELB. For the sake of testing I've added instances within the same availability zone and same subnet. But AWS best practices dictates that instances being added to an ELB should belong to different subnets and different availability zones.


Then we can add tags to our ELB. Tags basically help make AWS entities more identifiable when we go though resource usage in our bill.

Finally, we get a review screen where our settings for our ELB are displayed. if all is well click on create.


That is it. Our ELB will now be created and be visible in the ELB dashboard as shown below:


Notice that we are only shown the DNS name and not the IP address for the ELB. This is because the IP address will not remain constant throughout the life of the ELB.

Add users via receipt of user and password inputs from different files

I recently came across a question where in an admin wanted to create multiple users on Linux servers and had the password and user information contained in different files. If it were the same password for all users then that would've been easy to loop over but this was different because the user name and passwords were both unique.

So, here are sample files for lists of user names and password.

[root@pbox ~]# cat users
james
john
[root@pbox ~]# cat passwords
james123
john123

Now instead of coming up with a logic to run a loop with two variables I decided it would be easier to just combine the two files via paste command.

[root@pbox ~]# paste -d ' ' users passwords > creds
[root@pbox ~]#

So now the creds file looks like this:

[root@pbox ~]# cat creds
james james123
john john123


With the two file problem sorted the user creation process was a one line while loop away.

[root@pbox ~]# cat creds | while read user pass; do useradd $user ; echo $pass | passwd --stdin $user;done
Changing password for user james.
passwd: all authentication tokens updated successfully.
Changing password for user john.
passwd: all authentication tokens updated successfully.
[root@pbox ~]#

I hope this article was helpful to you and gives some interesting scripting ideas!
Thank you for reading.

Tuesday, 13 June 2017

Getting started with Perl one liners

A very interesting feature of the perl programming language is it's ability to execute condensed versions (one line) versions of otherwise complete perl scripts including but not limited to modifying files, replacing text etc. On many of the older UNIX based operating systems the installed versions of awk/sed/grep may not support all the text manipulation features of their modern updated counterparts or we may not have GNU versions of these packages available. In such situations perl one liners can prove to be a worthy replacement.

The basic syntax for a perl one liner is as follows:

perl <flag> <code>

The keyword perl invokes the perl interpreter.
The flag are the options that we'd like to specify to dictate how the code should run and the code is our actual perl logic.

To get information on how to use perl one liners on the command line just type perldoc perlrun as shown below:

[root@still ~]# perldoc perlrun | more
NAME
    perlrun - how to execute the Perl interpreter

SYNOPSIS
    perl [ -sTtuUWX ] [ -hv ] [ -V[:configvar] ]
    [ -cw ] [ -d[t][:debugger] ] [ -D[number/list] ]
    [ -pna ] [ -Fpattern ] [ -l[octal] ] [ -0[octal/hexadecimal] ]
    [ -Idir ] [ -m[-]module ] [ -M[-]'module...' ] [ -f ] [ -C [number/list] ]
    [ -S ] [ -x[dir] ] [ -i[extension] ]
    [ [-e|-E] 'command' ] [ -- ] [ programfile ] [ argument ]...

I've excluded most of the output because this gives a lot of information.

Let's write our first one liner which is obviously hello world!

[root@still ~]# perl -e 'print "Hello World!\n"'
Hello World!

The -e option means execute. This option will always be specified as a flag for every perl one liner. Also if we are using multiple flags then in that case the -e flag must be written last otherwise the code will not execute.

Perl is highly flexible when it comes to quotes. We can use q and qq wih different delimeters to represent single and double quotes respectively. Here are a few examples:

[root@still ~]# perl -e 'print qq|Hello World!\n|'
Hello World!
[root@still ~]# perl -e 'print q|Hello World!|'
Hello World![root@still ~]#

[root@still ~]# perl -e "print q|'Hello World'|; print qq|\n| "
'Hello World'


Now if we did not want to specify the newline manually then we could use -l option called the line feed flag. This operates like the chomp function we use within looping structures in perl programs. We often use the line feed flag in conjunction with while loops in perl one liners as well and I'll get to that shortly.


We can use the -p option to loop over a file served as input to the perl interpreter and print it out.
For example:

I have a file named ptest.

[root@still ~]# cat ptest
unix solaris
unix aix
unix hpux
linux centos
linux fedora
linux ubuntu

I can use perl -pe to just print our the file.

[root@still ~]# perl -pe ' ' ptest
unix solaris
unix aix
unix hpux
linux centos
linux fedora
linux ubuntu

Here is a screenshot from the perlrun perldoc describing -p flag in more detail


Now we get to looping and this is where the magic really starts.

So if I wanted to loop through the file ptest, search for the word solaris and print it I could do:

[root@still ~]# perl -le 'while (<>) {print if m^solaris^}' ptest
unix solaris

But I can just use the -n flag to signify a while loop and save some typing like this:

[root@still ~]# perl -nle 'print $_ if m^unix^' ptest
unix solaris
unix aix
unix hpux

This searches the file for the word unix and prints out the matches.
The $_ is the special variable which gets the value of the line being processed.
m signifies a regex match and ^ ^ are the delimeters.
I'd like to add here that I've used post condition here wherein the statement to be executed if the condition is true is written before the condition itself. Yes! We can do that in perl!

In fact I don't even need to mention that I need to print $_. Perl can work on an assumption if I leave it empty like I've done here:

[root@still ~]# perl -nle 'print if m^unix^' ptest
unix solaris
unix aix
unix hpux
[root@still ~]#


Next I'd like to talk about BEGIN and END blocks. These have a similar function in perl as they do in awk if you're familiar with that. BEGIN & END blocks get executed only at the beginning and at the end of the perl script/code/logic in this case the while loop.

Here are a couple of examples:

[root@still ~]# perl -nle 'print && $count++ if m^unix^ ; END {print $count}' ptest
unix solaris
unix aix
unix hpux
3
[root@still ~]#


This one liner will printing the word unix and the value of variable $count is incremented every time a match is found. The && operator does the print and increment together in one go if the condition is true. Again, I'm using post conditionals here. Inside the end block I've printed out the value of $count. The end block is executed after the while loop has run its course. Since perl is awesome, it assumes that the initial value of $count is 0 since I didn't assign anything.

Us UNIX/LINUX admins are very familiar with the use of grep search for stuff within text files. This next one liner is like a perl variant of a grep search:

[root@still ~]# perl -nle 'BEGIN { $regex = shift} print $+ if m~($regex)~' 'unix' ptest
unix
unix
unix


Within the BEGIN block I assign the value unix to the variable $regex. I'll explain how. When we supply arguments to a perl script they are stored within an array called ARGV. When I did the shift  perl shifted the first value in ARGV which was unix and assigned it to the variable $regex. Then the if condition is matched for the value of $regex which is unix and the matches are printed. In this we've also done a grouping regex match so  only the matched word got printed and not the complete line.

If I wanted to print the entire line and not just the matched string then here are a couple of examples on doing that:

[root@still ~]# perl -nle 'BEGIN { $regex = shift} print $_ if m~$regex~' 'unix' ptest
unix solaris
unix aix
unix hpux


[root@still ~]# perl -nle 'BEGIN { $regex = shift} print $_ if m~$regex~' 'unix\ss' ptest
unix solaris
[root@still ~]# perl -nle 'BEGIN { $regex = shift} print $_ if m~$regex~' 'unix\s.*?s$' ptest
unix solaris
[root@still ~]# perl -nle 'BEGIN { $regex = shift} print $_ if m~$regex~' 'unix\s.*?x$' ptest
unix aix
unix hpux
[root@still ~]#
[root@still ~]# perl -nle 'BEGIN { $regex = shift} print $+ if m~($regex)~' 'unix\s.*?x$' ptest
unix aix
unix hpux


One may argue that using grep is much simpler than what I did above with perl and for the most part it is. But if we get down to some nasty regex searches/matches then grep may not be enough.

Here's an example. I curled the homepage of my blog and put the content and put the output in a file named mypage.html. If I wanted to get details on the number of links to my articles I couldn't do that using grep alone.

This is what I could do with a perl one liner.

[root@still ~]# perl -nle 'BEGIN {$regex = shift} print $_ if m |$regex|' '^\<li\>\<a href=.*?\>$' mypage.html
<li><a href='http://myexperienceswithunix.blogspot.in/2017/06/exploring-amazon-s3-characteristics.html'>Exploring Amazon S3 characteristics</a></li>
<li><a href='http://myexperienceswithunix.blogspot.in/2017/06/increase-instance-root-volume-size.html'>Increase Instance root volume size using EBS snaps...</a></li>
<li><a href='http://myexperienceswithunix.blogspot.in/2017/06/creating-new-ami-from-existing-ami.html'>Creating a new AMI from an existing AMI</a></li>
<li><a href='http://myexperienceswithunix.blogspot.in/2017/06/creating-elastic-file-system-efs-within.html'>Creating an Elastic File System (EFS) within AWS</a></li>
<li><a href='http://myexperienceswithunix.blogspot.in/2017/06/aws-security-with-security-groups-and.html'>AWS security with Security Groups and NACLs</a></li>
<li><a href='http://myexperienceswithunix.blogspot.in/2017/06/creating-new-virtual-private-cloud-vpc.html'>Creating a new Virtual Private Cloud (VPC) within ...</a></li>
<li><a href='http://myexperienceswithunix.blogspot.in/2017/06/creating-glacier-vault.html'>Creating a glacier vault</a></li>
<li><a href='http://myexperienceswithunix.blogspot.in/2017/06/creating-ebs-volume-and-attaching-it-to.html'>Creating an EBS volume and attaching it to an inst...</a></li>
<li><a href='http://myexperienceswithunix.blogspot.in/2017/06/creating-s3-bucket.html'>Creating an S3 bucket</a></li>
<li><a href='http://myexperienceswithunix.blogspot.in/2017/06/launching-aws-ec2-instance.html'>Launching an AWS EC2 instance</a></li>


We can get even more specific with grouping and print just the links:


[root@still ~]# perl -nle 'print $2 if m |(^\<li\>\<a href=.*?)(.*?)\>(.*?)|' mypage.html
'http://myexperienceswithunix.blogspot.in/2017/06/exploring-amazon-s3-characteristics.html'
'http://myexperienceswithunix.blogspot.in/2017/06/increase-instance-root-volume-size.html'
'http://myexperienceswithunix.blogspot.in/2017/06/creating-new-ami-from-existing-ami.html'
'http://myexperienceswithunix.blogspot.in/2017/06/creating-elastic-file-system-efs-within.html'
'http://myexperienceswithunix.blogspot.in/2017/06/aws-security-with-security-groups-and.html'
'http://myexperienceswithunix.blogspot.in/2017/06/creating-new-virtual-private-cloud-vpc.html'
'http://myexperienceswithunix.blogspot.in/2017/06/creating-glacier-vault.html'
'http://myexperienceswithunix.blogspot.in/2017/06/creating-ebs-volume-and-attaching-it-to.html'
'http://myexperienceswithunix.blogspot.in/2017/06/creating-s3-bucket.html'
'http://myexperienceswithunix.blogspot.in/2017/06/launching-aws-ec2-instance.html'
'http://myexperienceswithunix.blogspot.in/2017/06/removing-shared-memory-segments-when.html'
[root@still ~]#

We can pipe out the output to other text manipulation and process it further:


[root@still ~]# perl -nle 'print $2 if m |(^\<li\>\<a href=.*?)(.*?)\>(.*?)|' mypage.html | cut -d/ -f6 | tr -d \'
exploring-amazon-s3-characteristics.html
increase-instance-root-volume-size.html
creating-new-ami-from-existing-ami.html
creating-elastic-file-system-efs-within.html
aws-security-with-security-groups-and.html
creating-new-virtual-private-cloud-vpc.html
creating-glacier-vault.html
creating-ebs-volume-and-attaching-it-to.html
creating-s3-bucket.html
launching-aws-ec2-instance.html
removing-shared-memory-segments-when.html


For the last example of one liners I'll demonstrate in place editing. This is analogous to using sed with the -i option.

Using the file ptest again for this example.

[root@still ~]# cat ptest
unix solaris
unix aix
unix hpux
linux centos
linux fedora
linux ubuntu


Let's replace all occurrences of the word unix with UNIX and keep a backup of the original file.

[root@still ~]# perl -pi.bkp -e 's/unix/UNIX/g' ptest
[root@still ~]# cat ptest
UNIX solaris
UNIX aix
UNIX hpux
linux centos
linux fedora
linux ubuntu
[root@still ~]# cat ptest.bkp
unix solaris
unix aix
unix hpux
linux centos
linux fedora
linux ubuntu
[root@still ~]#


And that's it! Note that since this was a search and replace operation there was no output printed to the terminal like we have in the case of sed.

Exploring Amazon S3 characteristics

S3 is not a file system. It's used to store files for usage but does not store data in a transactional manner. I've written an article on creating a S3 bucket so in this article I'll focus on S3 characteristics and properties.


AWS S3 security:

S3 provides multiple security options/permissions and if more than one permission type is selected then the option with least privilege is implemented on the bucket. To view the available permission options select the S3 bucket and click on permissions. You would see an output similar to the one shown below:


The first section we see is that of ACLs. They are the legacy permission policy option and provide a functionality similar to that of NTFS permissions.
At the moment only my user sahil_eng008 is listed. We can add more users by clicking on add users and select the grants we'd like to give them.

Next we have bucket policies. The offer a more granular set of permissions. Click on bucket policy.
This opens up a bucket policy editor and we can write our policy here.


But if we are not proficient in write a policy in JSON in the editor we have an option of using the policy generator. So let's click that.
This opens up the policy generator and we can set our required selections here for the policy.


The policy generator is available for services other than S3 so we select the type of policy as S3 bucket policy. The principal is the user name to which we'd like to apply the policy. The service will be Amazon S3 and the actions will be the permissions we wish to grant to the user. The ARN will be the ARN of the S3 bucket we are applying the policy to. Now click on Add Statement.
We get the below output telling us that our statement has been added and is being displayed.


Next we click on generate policy to create a policy in JSON document.


We need to copy this JSON document and paste it in our policy editor window.


Now if I try to save the policy it will error out because I do not have the user ssuri007 created.


We can use IAM policies to restrict or grant access to S3 buckets. This also allows a granular security configuration.
Finally we can also use presigned URLs or Query String Authentication wherein we'll provide users with a link to access S3 objects but the link or URL will remain valid only for a limited period of time.


Storage Class:

If we select an object it's properties pop up and we can notice a section called Storage class


The durability and reliability options provided by S3 are categorized by Storage classes with Standard storage class offering the highest durability and reliability and Reduced Redundancy Storage(RRS) class offering the lowest level of durability and reliability. The storage class of e S3 bucket is standard by default and cannot be modified but we can modify the storage classes of the objects within the bucket.


Event notifications:

We can configure event notifications to perform an action when a particular event is triggered against the bucket. To configure this we need to select the bucket, go to it's properties and click on Events.


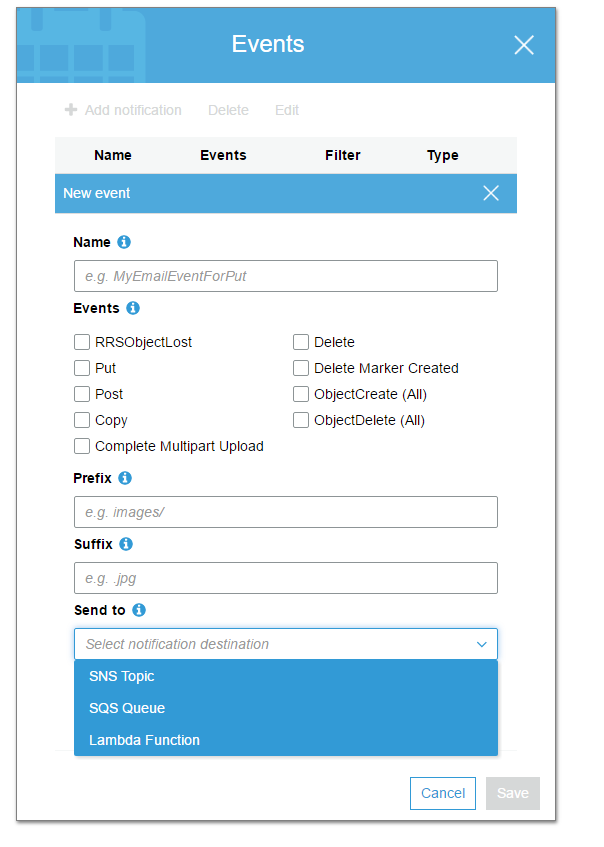
Once we click on Events the below menu opens up. Here we can name the event, select the type of event, add prefix/suffix identifiers for the objects against whom the event should be triggered and finally select the AWS service which the event should be sent to.


Logging:

We can enable audit logs to view a log of actions performed on the bucket and related object. To enable logging select the object, go to its properties and click on logging and check mark the radio button to enable logging and click save


Versioning:

This allows us to preserve and retrieve previous versions of the objects. To enable versioning select the object, go to its properties and click on versioning  and check mark the radio button to enable versioning and click save.


Versioning is also a pre-requisite for enabling cross region replication which is next.


Cross region replication:

Data stored in a S3 bucket in Standard storage class is replicated within multiple devices within a facility and multiple facilities within a region. But the replication is restricted to within the same region. If for some reason we need to replicate the bucket or an object within the bucket to a different region then we may do so with cross region replication provided we have versioning enabled as I mentioned earlier. To enable it select the object, go to its properties and click on Cross region replication and check mark the radio button to enable Cross region replication, add the bucket/object and destination region information as per requirement and click save.


We noticed a pop up on the lower left corner of the screen saying "Requester pays". Data transfer within S3 is chargeable. so in case we have a vendor/client who has requested us to transfer the data contained in the S3 bucket and they also have an AWS account then we can tell AWS to bill them for the data transfer cost and not us.


Life cycle management:

Typically data residing in S3 is not meant for long term storage. Life cycle management allows us to apply very granular rules wherein we can automate the transfer of our objects, the entire bucket or older versions of the objects to be transferred to a lower tiered cheaper storage glacier after a certain amount of time. We can also add rules to create new versions of objects after a set time and archive/expire the old versions. We can also add rules to remove objects from S3 or archived data in glacier to be deleted from AWS entirely post a set time period. To enable and add rules for life cycle management, select the object, go to management and click on add life cycle rule under lifecycle.


This was the last property I intended to discus in this article. I hope the article was informative and I thank you for reading it.

Using capture groups in grep in Linux

Introduction Let me start by saying that this article isn't about capture groups in grep per se. What we are going to do here with gr...