
Splunk is a powerful log processing, indexing & analysis engine which can be used to not only search the data we feed into it but also also thresholds to be configured for anomalies & provides monitoring & alerting functionality as well. We can feed a wide range of data into it including but not limited to syslog, security logs, webserver legs etc.
In this article I've used splunk lite which is free as long as the data fed into it is less than 500MB per day.
Installation:
Splunk lite is a single rpm installation & the package can be downloaded from the official website.
By default splunk will install in the /opt directory. To start splunk go to the path /opt/splunk/bin/ & type type:
[root@centops ~]# cd /opt/splunk/bin/
[root@centops bin]# ./splunk start
splunkd 4997 was not running.
Stopping splunk helpers...
[ OK ]
Done.
Stopped helpers.
Removing stale pid file... done.
Splunk> Take the sh out of IT.
Checking prerequisites...
Checking http port [8000]: open
Checking mgmt port [8089]: open
Checking appserver port [127.0.0.1:8065]: open
Checking configuration... Done.
Checking critical directories... Done
Checking indexes...
Validated: _audit _internal _introspection _thefishbucket history main summary
Done
Checking filesystem compatibility... Done
Checking conf files for problems...
Done
Checking default conf files for edits...
Validating installed files against hashes from '/opt/splunk/splunklight-6.4.3-b03109c2bad4-linux-2.6-x86_64-manifest'
All installed files intact.
Done
All preliminary checks passed.
Starting splunk server daemon (splunkd)...
Done
[ OK ]
Waiting for web server at http://127.0.0.1:8000 to be available.......... Done
If you get stuck, we're here to help.
Look for answers here: http://docs.splunk.com
The Splunk web interface is at http://centops:8000
To access the web interface open the URL http://<your IP address>:8000.& the following page should open:

by default the hosts & sources list would be empty. to add localhost as a candidate, go to add data >Manage Add-ons > *nix > enable > set up. Under set up select the files & directories that should be available to splunk for data analysis.
Feeding data from a remote system to splunk:
To feed data from a remote system to splunk we'll be using a universal forwarder.
First, we'll configure splunk to accept data from the universal forwarder:
Click the menu at the top left of the screen to open the sidebar menu and select Data > Data receiving. Then click Add new.

In the Listen on this port field, enter the port number that you want the Splunk Light instance to listen on and click Save.
The default port is 9997.

Download the universal forwarder pacakge for the specific Linux distribution from the Splunk website & install it.
[root@rheldb ~]# rpm -ivh splunkforwarder-6.4.3-b03109c2bad4-linux-2.6-x86_64.rpm
warning: splunkforwarder-6.4.3-b03109c2bad4-linux-2.6-x86_64.rpm: Header V4 DSA/SHA1 Signature, key ID 653fb112: NOKEY
Preparing... ########################################### [100%]
1:splunkforwarder ########################################### [100%]
complete
[root@rheldb ~]#
[ OK ]
By default, the universal forwarder will install in /opt/splunkforwarder. To start the universal forwarder go to the path /opt/splunkforwarder/bin & type:
[root@rheldb bin]# ./splunk start --accept-license
This appears to be your first time running this version of Splunk.
Splunk> Take the sh out of IT.
Checking prerequisites...
Checking mgmt port [8089]: open
Creating: /opt/splunkforwarder/var/lib/splunk
Creating: /opt/splunkforwarder/var/run/splunk
Creating: /opt/splunkforwarder/var/run/splunk/appserver/i18n
Creating: /opt/splunkforwarder/var/run/splunk/appserver/modules/static/css
Creating: /opt/splunkforwarder/var/run/splunk/upload
Creating: /opt/splunkforwarder/var/spool/splunk
Creating: /opt/splunkforwarder/var/spool/dirmoncache
Creating: /opt/splunkforwarder/var/lib/splunk/authDb
Creating: /opt/splunkforwarder/var/lib/splunk/hashDb
New certs have been generated in '/opt/splunkforwarder/etc/auth'.
Checking conf files for problems...
Done
Checking default conf files for edits...
Validating installed files against hashes from '/opt/splunkforwarder/splunkforwarder-6.4.3-b03109c2bad4-linux-2.6-x86_64-manifest'
All installed files intact.
Done
All preliminary checks passed.
Starting splunk server daemon (splunkd)...
Done
[ OK ]
Configure universal forwarder to send data to splunk lite:
./splunk add forward-server <host>:<port> -auth <username>:<password>
[root@rheldb bin]# ./splunk add forward-server 192.168.44.138:9997 -auth admin:changeme
Added forwarding to: 192.168.44.138:9997.
[root@rheldb bin]#
IP address is the address of the splunk lite instance.
Configure universal forwarder to be a deployment client.
The splunk lite instance is the deployment server & will receive inputs from the universal forwarder which will be the deployment client.
./splunk set deploy-poll <host>:<mgmtPort>
[root@rheldb bin]# ./splunk set deploy-poll 192.168.44.138:8089
Configuration updated.
[root@rheldb bin]# ./splunk restart
Stopping splunkd...
Shutting down. Please wait, as this may take a few minutes.
[ OK ]
Stopping splunk helpers...
[ OK ]
Done.
Splunk> Take the sh out of IT.
Checking prerequisites...
Checking mgmt port [8089]: open
Checking conf files for problems...
Done
Checking default conf files for edits...
Validating installed files against hashes from '/opt/splunkforwarder/splunkforwarder-6.4.3-b03109c2bad4-linux-2.6-x86_64-manifest'
All installed files intact.
Done
All preliminary checks passed.
Starting splunk server daemon (splunkd)...
Done
[ OK ]
[root@rheldb bin]#
Now we'll configure our splunk lite instance to receive data forwarded by the universal forwarder.
In the Splunk Light user interface, click Search in the top menu bar. In the Search view, under Data on the right of the screen, click the Add Data button.
On the Add Data view, click Forward. Next to Select Server Class, click New.
Available host(s) are listed, which are the hostnames of the universal forwarders (deployment clients) connected to the Splunk Light instance (deployment server). Under Available host(s), click one or more forwarder hosts to add to the Selected host(s) box. This allows you to add a new Server Class.

In the New Server Class Name field, enter a name for the new server class. Click Next near the top of the screen.
Select the type of data for the universal forwarder to collect. In this example, Files & Directories is selected.

Click Next near the top of the screen. In the Input Settings view, next to Source type click Automatic.
Click Review near the top of the screen. Click Submit.
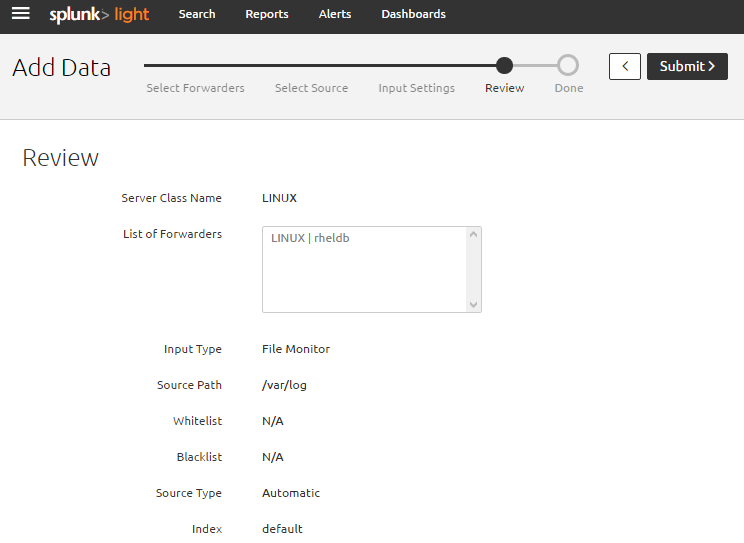
The File input has been created successfully displays. Click Start Searching to see the data in the Search view.

With that we are ready to start searching.
Select the host we just added & a new search tab will open. From the Selected fields menu on the lower left of the screen under sources we can select one of the log files & open it for analysis:

No comments:
Post a Comment