Tuesday, 8 November 2016

Exploring "Infrastructure as code" with Opscode Chef Part 5 (using local mode & more on OHAI)

Using local mode:

In case we want to bypass the chef server & workstation all together for some reason then we can do that as well. Chef client's local mode allows us to apply a locally created recipe without communicating with the chef server or workstation.
Here's a demo:

On the client, create chef-repo directory & inside that directory create the recipe file:

 mkdir chef-repo
[sahil@cclient1 ~]$ cd chef-repo/
[sahil@cclient1 chef-repo]$ vi hello.rb
hello world[sahil@cclient1 chef-repo]$ cat hello.rb
file '/tmp/motd' do
  content 'hello world'
end
[sahil@cclient1 chef-repo]$

Now to apply the recipe, run chef client in local mode:

[sahil@cclient1 chef-repo]$ chef-client --local-mode hello.rb
[2016-11-06T06:04:48-05:00] WARN: No config file found or specified on command line, using command line options.
[2016-11-06T06:04:48-05:00] WARN: No cookbooks directory found at or above current directory.  Assuming /home/sahil/chef-repo.
Starting Chef Client, version 12.15.19
resolving cookbooks for run list: []
Synchronizing Cookbooks:
Installing Cookbook Gems:
Compiling Cookbooks...
[2016-11-06T06:04:50-05:00] WARN: Node cclient1 has an empty run list.
Converging 1 resources
Recipe: @recipe_files::/home/sahil/chef-repo/hello.rb
  * file[/tmp/motd] action create
    - create new file /tmp/motd
    - update content in file /tmp/motd from none to b94d27
    --- /tmp/motd       2016-11-06 06:04:50.389511251 -0500
    +++ /tmp/.chef-motd20161106-2861-1d6cw4j    2016-11-06 06:04:50.389511251 -0500
    @@ -1 +1,2 @@
    +hello world
    - restore selinux security context

Running handlers:
Running handlers complete
Chef Client finished, 1/1 resources updated in 01 seconds


Let's verify that the file has been created:

[sahil@cclient1 chef-repo]$ cat /tmp/motd
hello world[sahil@cclient1 chef-repo]$ 


Viewing information collected by OHAI:

As mentioned earlier, OHAI collects a lot of information in JSON format. You can check this information from the chef server GUI by selecting the node & then clicking on the attributes section. You can also check this information locally by just typing ohai command on the client node.

Here is a snippet of the output:

[root@cclient1 ~]# ohai | more
{
  "cpu": {
    "0": {
      "vendor_id": "GenuineIntel",
      "family": "6",
      "model": "60",
      "model_name": "Intel(R) Core(TM) i5-4440 CPU @ 3.10GHz",
      "stepping": "3",
      "mhz": "3092.833",
      "cache_size": "6144 KB",
      "physical_id": "0",
      "core_id": "0",
      "cores": "1",

      "flags": [
--------------------------------------------------------------------------------------
--------------------------------------------------------------------------------------

We can also view the information about a node gathered by OHAI from the chef workstation:

[sahil@cwork recipes]$ sudo knife node show mychefnode -l | more
Node Name:   mychefnode
Environment: _default
FQDN:        cclient1
IP:          192.168.44.102
Run List:    recipe[apache::addscreen], recipe[apache]
Roles:
Recipes:     apache, apache::default, apache::addscreen
Platform:    centos 7.0.1406
Tags:
Attributes:
tags:

Default Attributes:

Override Attributes:

Automatic Attributes (Ohai Data):
block_device:
  dm-0:
    logical_block_size:  512
    physical_block_size: 512
    removable:           0
    rotational:          1
    size:                2097152
  dm-1:
    logical_block_size:  512
    physical_block_size: 512
    removable:           0
    rotational:          1
    size:                17842176
------------------------------------------------------------------------------------------
------------------------------------------------------------------------------------------

From the chef workstation we can also query to a particular attribute belonging to a node:

[sahil@cwork recipes]$ sudo knife node show mychefnode -a name
mychefnode:
  name: mychefnode

We can also run a key value search on chef solr using the knife utility since all information gathered by OHAI is available for searching & indexing at the chef server.

[sahil@cwork recipes]$ sudo knife search node "platform:centos" -a name
1 items found

mychefnode:
  name: mychefnode

Monday, 7 November 2016

One liner to get DB space usage

With this article I'd like to share a clever one liner to calculate the space used by DB file systems provided that the DB uses conventional file systems & not ASM.

I tried it in Linux but it should work in other OS as well after a little tweaking.

So, here is the df output from a Linux DB server after filtering for uXX file systems & /export file system:

[root@~]#  df -m /u?? /export | grep -v usr
Filesystem           1M-blocks      Used Available Use% Mounted on
/dev/mapper/vg02-lv00
                          9072      5444      3168  64% /u00
/dev/mapper/vg02-lv01
                         11088      9303      1222  89% /u01
/dev/mapper/vg02-lv02
                         11088      9303      1222  89% /u02
/dev/mapper/vg02-lv03
                         15119      9374      4978  66% /u03
/dev/mapper/vg02-lv04
                       1239758    252874    923909  22% /u04
/dev/mapper/vg02-lv05
                         35278      5222     28264  16% /u05
/dev/mapper/vg02-lv06
                        455586    381127     51321  89% /u06
/dev/mapper/vg02-lv07
                        332618      1649    314077   1% /u07
/dev/mapper/vg02-lv08
                       1456463   1277325    105168  93% /u08
/dev/mapper/vg02-lv09
                        120952     96470     18339  85% /u09
/dev/mapper/vg02-lv10
                        680355    620184     25614  97% /u10
/dev/mapper/vg02-lv11
                       1995707   1473802    420550  78% /u11
/dev/mapper/vg02-lv12
                        163286    117519     37473  76% /u12
/dev/mapper/vg02-lv13
                         72572     21574     47311  32% /u13
/dev/mapper/vg02-lv14
                        201587    181424      9924  95% /u14
/dev/mapper/vg02-lv15
                        489856    460667      4310 100% /u15
/dev/mapper/vg00-lv02
/dev/mapper/vg02-lv16
                         15119      4877      9475  34% /export

So, to get the space used by these file systems we can type the following one liner:

 df -m /u?? /export | grep -v usr | awk '{sum += $2} END {print sum/1024}'

4812.64

& That's it!

Sunday, 6 November 2016

Arithmetic on the command line

This is a brief article describing different techniques employed for performing arithmetic operations on the command line.

Using expr:

Using the expr built in is a common way of evaluating arithmetic expressions. Here is an example:

[root@cclient1 ~]# v=10; x=1; expr $v + $x
11

Using let:

Let is another bash built in that can be used for performing arithmetic operations on the command line. Here are a couple of examples:

[root@cclient1 ~]# s=10; let "s+=10"; echo $s
20

 s=10; echo $(($s+10))
20


Both expr & let are easy to use but their drawback is that they can't handle floating point expressions.

For that we have two more commands coming in the picture viz bc & awk.

Using bc:

Invoking bc directly from the command line isn't very useful in a script as we'll usually want the script to be non-interactive. So, here are a few examples of feeding input arithmetic expressions to bc to evaluate:

[root@cclient1 ~]# a=10;b=15; echo "scale=4 ; $a/$b" | bc
.6666

[root@cclient1 ~]#  a=10;b=15; bc <<< "scale=2; $a/$b"
.66

[root@cclient1 ~]# a=100;b=70; echo "$a/$b" | bc -l
1.42857142857142857142


The scale represents the level of precision we want after the floating point. The "-l" options specifies maximum precision possible.


Using awk:

Awk can be used for performing arithmetic operations on it's own as well as on fields extracted from a file.

An example of awk standalone arithmetic usage:

[root@cclient1 ~]# a=10;b=7;  awk "BEGIN {print $a / $b}"
1.42857

If you use the usual ' commas that we're used for enclosing awk expressions then it'll return an error since under ' ' the $ signs get interpreted literally. The BEGIN keyword specifies one time execution.

An example of awk extracting fields from a column & summing the results:

[root@cclient1 ~]# cat file | awk '{ print $1}'
15
8
10
17
26

[root@cclient1 ~]# awk '{ sum += $1} END { print sum}' file
76
  

Exploring "Infrastructure as code" with Opscode Chef Part 4 (expanding the first cookbook)

In the last article we wrote described the components of a cookbook & wrote a simple cookbook with a recipe consisting of a resource named httpd of type package & the action being performed was installation of the package.

 I added a couple of things to this recipe & it looks like this now:

[sahil@cwork recipes]$ cat default.rb
#
# Cookbook Name:: apache
# Recipe:: default
#
# Copyright 2016, YOUR_COMPANY_NAME
#
# All rights reserved - Do Not Redistribute
#


package_name = "httpd"
service_name = "httpd"
doc_root = "/var/www/html"


if node["platform"] == "ubuntu"
   package_name = "apache2"
   service_name = "apache2"
   doc_root = "/var/www"
end


package package_name do
  action :install
end

service service_name do
  action [:start, :enable]
end

#cookbook_file "#{doc_root}/index.html" do
 # source "index.html"
  #mode "0644"
#end


template "#{doc_root}/index.html" do
  source "index.html.erb"
  mode "0644"
end


That's a major overhaul from the last recipe. So, here's a breakdown of the updated cookbook.

The package_name, service_name & doc_root are variables. The intention of using variables is to make the cookbook platform independent in the sense that it can run on centos as well as ubuntu platforms without modification.
When the recipe is being applied, the if condition will be checked for the platform attribute returned by OHAI & depending on the result the value of the variables will be substituted.
If I move to the second resource 'service', the actions are comma separated & under []. This is basically the ruby syntax for an array since we are entering more than one values for the action parameter.
The next resource is 'cookbook_file'. This states that we'll be using a file that resides in the <cookbook_name>/files/default directory. So in our case, the file index.html lies in /home/sahil/chef-repo/cookbooks/apache/files/default.

[sahil@cwork default]$ pwd
/home/sahil/chef-repo/cookbooks/apache/files/default
[sahil@cwork default]$ ls
index.html
[sahil@cwork default]$ cat index.html
<html>
 <body>
   <h1> Hi, my name is Sahil!!</h1>
 </body>
</html>

In the above recipe I've commented out this action but I had checked & executed it earlier. The recipe copies the file index.html to /var/www/html on the client node.


The next part, the template allows us to use a .erb file. ERB means extended ruby. So, we can use attributes returned by OHAI & their values will be dynamically substituted when during the chef run.
the location for the file index.html.erb is /home/sahil/chef-repo/cookbooks/apache/templates/default.

[sahil@cwork default]$ pwd
/home/sahil/chef-repo/cookbooks/apache/templates/default
[sahil@cwork default]$ ls
index.html.erb
[sahil@cwork default]$ cat index.html.erb
<html>
 <body>
   <h1> Hi, from server <%= node["fqdn"] %> </h1>
   <p>
     This server has <%= node["memory"]["total"].to_i / 1024 %> MB memory
   </p>
 </body>
</html>
[sahil@cwork default]$


The <%=node["attribute"]%> is the syntax we need to use while dynamically substituting attribute values.

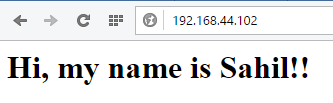
When I uploaded & ran this cookbook & pointed the browser to my chef client node IP 192.168.44.102, It showed the following:


Common resource types:

Given below are some common resource types & their associated actions & attributes.

package, service, directory, file, bash, execute, cron, cookbook_file

Package:
actions:= :install, :upgrade, :remove, :purge, :reconfigure
attribute:= allow_downgrade, arch, flush_cache, options, source, version

Service:
actions:= :enable, :disable, :start, :stop, :restart, :reload
attributes:= init_command, priority, start_command, stop_command, restart_command, status_command, reload_command, supports

Directory:
actions:= :create, :delete
attribute:= path, owner, group, mode, recursive

File:
actions:= :create, :delete, create_if_missing, :touch
attribute:= path, content, owner, group, mode, backup

Bash:
actions:= :run, :nothing
attribute:= code, command, creates, cwd, user, group, umask, environment, timeout, path, return, flags

Execute:
actions:= :run, :nothing
attribute:= command, creates, cwd, user, group, umask, environment, timeout, path, return, flags

Cron:
actions:= :create, :delete,
attributes:= command, day, hour, minute, month, week, user, path, shell, home, mailto

Cookbook_file:
actions:= :create, :delete, :create_if_missing, touch
attributes:= path, content, owner, group, mode, backup, source

Exploring "Infrastructure as code" with Opscode Chef Part 3 (the first cookbook)

What is a cookbook?

Cookbooks serve as the fundamental unit of configuration and policy details that Chef uses to bring a node into a specific state.  A cookbook is a folder that stores all policies & configurations related to clients. Cookbooks are created on the workstation and then uploaded to a Chef server. From there, recipes and policies described within the cookbook can be assigned to nodes as part of the node's "run-list". A run-list is a sequential list of recipes and roles that are run on a node by chef-client in order to bring the node into compliance with the policy you set for it.

Creating a cookbook:

To create a new cookbook use the 'knife cookbook create' command followed by the cookbook name:


[sahil@cwork chef-repo]$ knife cookbook create apache
WARN: This command is being deprecated in favor of `chef generate cookbook` and will soon return an error.
Please use `chef generate cookbook` instead of this command.
 at /opt/chefdk/embedded/lib/ruby/gems/2.3.0/gems/chef-12.15.19/lib/chef/knife.rb:429:in `block in run_with_pretty_exceptions'
** Creating cookbook apache in /home/sahil/chef-repo/cookbooks
** Creating README for cookbook: apache
** Creating CHANGELOG for cookbook: apache

** Creating metadata for cookbook: apache

This creates a cookbook called apache & creates the entire cookbook directory structure for this cookbook under /home/sahil/chef-repo/cookbooks/apache.
Let's see what chef cooked up in this folder:

[sahil@cwork apache]$ pwd
/home/sahil/chef-repo/cookbooks/apache
[sahil@cwork apache]$ ls -l
total 12
drwxrwxr-x. 2 sahil sahil    6 Nov  5 10:40 attributes
-rw-rw-r--. 1 sahil sahil  433 Nov  5 10:40 CHANGELOG.md
drwxrwxr-x. 2 sahil sahil    6 Nov  5 10:40 definitions
drwxrwxr-x. 3 sahil sahil   20 Nov  5 10:40 files
drwxrwxr-x. 2 sahil sahil    6 Nov  5 10:40 libraries
-rw-rw-r--. 1 sahil sahil  276 Nov  5 10:40 metadata.rb
drwxrwxr-x. 2 sahil sahil    6 Nov  5 10:40 providers
-rw-rw-r--. 1 sahil sahil 1455 Nov  5 10:40 README.md
drwxrwxr-x. 2 sahil sahil   23 Nov  5 10:41 recipes
drwxrwxr-x. 2 sahil sahil    6 Nov  5 10:40 resources
drwxrwxr-x. 3 sahil sahil   20 Nov  5 10:40 templates
[sahil@cwork apache]$

Now let's describe what the different components listed above mean.

Anatomy of a cookbook:

Recipes:
The recipes directory is the place where most of the work gets done. A recipe is a ruby file contained in a cookbook. It contains all configuration settings required to bring a node to desired state. A cookbook can contain more than one recipe or depend on other outside recipes. By default, the recipes directory will contain a default.rb file which we'll use to describe the configuration we want chef to apply to the client node. Recipes contain a collection of resources & should be assigned to a run list in a node.

Resource:
A resource may represent a user, file, service etc & are written using a ruby DSL (Domain Specific Language). A resource inside a recipe is a ruby code block which defines a step that needs to be implemented by chef on the node to achieve a desired configuration state. Basically, this means that resources are declarative i.e. we say what we want to happen & not how. Chef uses the 'platform' the node is running on to determine the correct provider for a resource.

Attributes:
Attributes are used to define the desired state of the resource. An attribute can also provide details abut a specific component on the node. Attributes can be used to install packages, create users etc.

Templates:
Cookbook also contains templates for creating configuration files on the node.Templates are used to create a configuration file on the node, by adding the relevant values that are applicable to that particular node during chef agent run.


The syntax of the recipe named default defined in default.rb file is as follows:

type "name" do
    attribute "value"
    action :type_of_action
end


Here is the default.rb file from the apache cookbook we just created:

[sahil@cwork recipes]$ cat default.rb
#
# Cookbook Name:: apache
# Recipe:: default
#
# Copyright 2016, YOUR_COMPANY_NAME
#
# All rights reserved - Do Not Redistribute
#
package 'httpd' do
  action :install
end
[sahil@cwork recipes]$


So, in the above recipe we are telling chef to use 'package' resource & install httpd.

Providers:
This location will contain your custom actions and the actual code that will execute a particular action. Let's consider you have created a custom resource of your own, with few custom actions of your own. You then need to actually define the things that needs to happen during that action.
You define your actions in this directory.

Definition:
Definitions allow you can actually create a newly named resource, by using the existing list of resources. A good use case of using definitions is when you have a pattern of resources repeating over and over again in your cookbook.
Definition in itself is not a resource as such, but its a collection of resources. 


Files:
This directory contains all the files that you need to copy to the servers as part of your chef cookbook


Now, that we have created the cookbook & gone through the different aspects of a cookbook it's time to apply the cookbook.

Upload the cookbook:

We need to upload the cookbook we created to the central chef server.

[sahil@cwork recipes]$ sudo knife cookbook upload apache
Uploading apache       [0.1.0]
Uploaded 1 cookbook.
[sahil@cwork recipes]$

Add cookbook to the node's run list:
Open the web interface & click on the nodes tab. From there select the node & click on 'edit run list'

Drag & drop the recipe apache from available recipes section to current run list section.


To execute the cookbook go to the chef client node & run chef-client command.
[sahil@cclient1 ~]$ sudo chef-client
Starting Chef Client, version 12.15.19
resolving cookbooks for run list: ["apache"]
Synchronizing Cookbooks:
  - apache (0.1.0)
Installing Cookbook Gems:
Compiling Cookbooks...
Converging 1 resources
Recipe: apache::default
  * yum_package[httpd] action install
    - install version 2.4.6-40.el7.centos.4 of package httpd
Running handlers:
Running handlers complete
Chef Client finished, 1/1 resources updated in 03 minutes 16 seconds
[sahil@cclient1 ~]$

Verify that apache did get installed:
[sahil@cclient1 ~]$ rpmquery httpd
httpd-2.4.6-40.el7.centos.4.x86_64
[sahil@cclient1 ~]$

When a chef client executes a cookbook from it's run list, this process is known as 'chef run'. Let's describe a typical chef run:
Whenever the chef-client command is run, OHAI is executed & automatic attributes are collected.
These attributes are used to build node objects. Info returned by OHAI is in JSON format.
The node authenticates itself with the chef server using /etc/chef/client.pem key file.
The chef server processes the node objects which contain run lists associated with the nodes.
The run list in turn has info about roles & recipes.
Once this information is identified the chef server sends the configuration that is to be applied to the clients.
This info is shared in the form of node objects in JSON format.
The chef client then downloads the cookbooks containing the recipes which are to be applied to the node.
The recipes are stored in /var/chef/cache directory on the node.

The client would then start applying the recipes:
The chef client will first load the required libraries as they would be required by Ruby & other language extensions.
The recipes are then loaded & appropriate actions are performed to bring the node to a desired state.
If the recipes get applied successfully a message is sent to the queue stating that the run list executed successfully.

Notification handlers:
They are the final part of a chef client run & are installed as modules with the chef client. After the chef client run has been completed, we can write a notification handler to take an appropriate action in case the chef run fails.
For example, a notification handler to email the stack trace of a failed chef run to the chef admin.
Notification handlers can also be used for reporting purposes since it contains all the data corresponding to a chef client run.


Summarizing the chef run:

  1. When chef client runs, first it executes OHAI which gathers all the data about the node (attributes)
  2. The client is authenticated.
  3. The cookbooks are synchronized & loaded.
  4. Then the cookbooks are converged (recipes are applied) on policies.
  5. Success/failure status is checked.
  6. The result is communicated to chef server server.


Chef node authentication:

When knife bootstraps a node it transfers the organization validation key (validation.pem) file to the node. The node then connects to the chef server & using the validation.pem file it requests a API client from the server. The server in turn provides the client.pem file which the node uses in future to communicate with the node & sign requests. In a scenario where the client.pem file is not available for some reason the above mentioned process is repeated. If both client.pem & validation.pem are not available then the node is not able to authenticate with the chef server & we get a 401 error.


Breaking down the converge phase:

In the policy converge phase the chef client checks whether it's conforming to the policies as laid out to it by the chef server & the cookbooks it just downloaded. If it conforms then the idempotence property comes into play & no action is taken. Otherwise the recipes are applied appropriately.
The converge phase has two parts:

Compile phase: The cookbooks are loaded & each recipe is read & the resources from the recipes are collected in a resource collection list.

Execute phase: In this phase the actions defined in the recipes are executed for the corresponding resources.

Add cookbook to the node's run list without using web interface:

Earlier I described how we could add a cookbook to a node's run list from the GUI interface. Lets' now do it without a GUI.
I edited the apache cookbook created & added steps to start apache after install:
[sahil@cwork recipes]$ cat default.rb
#
# Cookbook Name:: apache
# Recipe:: default
#
# Copyright 2016, YOUR_COMPANY_NAME
#
# All rights reserved - Do Not Redistribute
#
package 'httpd' do
  action :install
end

service 'httpd' do
  action :start
end

I then uploaded the cookbook to the server again.
[sahil@cwork recipes]$ sudo knife cookbook upload apache
Uploading apache         [0.1.0]
Uploaded 1 cookbook.

Then I updated the node's run list using the knife utility from within the chef workstation:

[sahil@cwork recipes]$ sudo  knife node run_list add mychefnode "recipe[apache]"
mychefnode:
  run_list: recipe[apache]

Then I logged into the client to apply the cookbook via chef-client:

[sahil@cclient1 ~]$ sudo chef-client
Starting Chef Client, version 12.15.19
resolving cookbooks for run list: ["apache"]
Synchronizing Cookbooks:
  - apache (0.1.0)
Installing Cookbook Gems:
Compiling Cookbooks...
Converging 1 resources
Recipe: apache::default
  * yum_package[httpd] action install (up to date)

Running handlers:
Running handlers complete
Chef Client finished, 0/1 resources updated in 19 seconds
[sahil@cclient1 ~]$ sudo chef-client
Starting Chef Client, version 12.15.19
resolving cookbooks for run list: ["apache"]
Synchronizing Cookbooks:
  - apache (0.1.0)
Installing Cookbook Gems:
Compiling Cookbooks...
Converging 2 resources
Recipe: apache::default
  * yum_package[httpd] action install (up to date)
  * service[httpd] action start
    - start service service[httpd]

Running handlers:
Running handlers complete
Chef Client finished, 1/2 resources updated in 02 seconds


Note: while adding the recipe if we use the name of the cookbook, the default.rb file is used. 


Adding another recipe from a cookbook to a node's run list:

So, under the apache cookbook, I created another recipe called addscreen:

[sahil@cwork recipes]$ cat addscreen.rb
#
# Cookbook Name:: apache
# Recipe:: addscreen
#
# Copyright 2016, YOUR_COMPANY_NAME
#
# All rights reserved - Do Not Redistribute
#
package 'screen' do
  action :install
end


Now we need to upload the cookbook to the server again:

[sahil@cwork recipes]$ sudo knife cookbook upload apache
Uploading apache         [0.1.0]
Uploaded 1 cookbook.

Add the cookbook to to the node's run list:

[sahil@cwork recipes]$ sudo  knife node run_list add mychefnode "recipe[apache::addscreen]"
mychefnode:
  run_list:
    recipe[apache]
    recipe[apache::addscreen]


To view the current run list & some more information about the client node, run:

[sahil@cwork chef-repo]$ sudo knife node show mychefnode
Node Name:   mychefnode
Environment: _default
FQDN:        cclient1
IP:          192.168.44.102
Run List:    recipe[apache], recipe[apache::addscreen]
Roles:
Recipes:     apache, apache::default, apache::addscreen
Platform:    centos 7.0.1406
Tags:
[sahil@cwork chef-repo]$


To apply the recipe login to the node & type chef-client:

[sahil@cclient1 ~]$ sudo chef-client
Starting Chef Client, version 12.15.19
resolving cookbooks for run list: ["apache", "apache::addscreen"]
Synchronizing Cookbooks:
  - apache (0.1.0)
Installing Cookbook Gems:
Compiling Cookbooks...
Converging 3 resources
Recipe: apache::default
  * yum_package[httpd] action install (up to date)
  * service[httpd] action start (up to date)
Recipe: apache::addscreen
  * yum_package[screen] action install
    - install version 4.1.0-0.23.20120314git3c2946.el7_2 of package screen

Running handlers:
Running handlers complete
Chef Client finished, 1/3 resources updated in 26 seconds


Delete a recipe from a node's run list:

[sahil@cwork recipes]$ sudo  knife node run_list remove  mychefnode "recipe[addscreen]"
mychefnode:
  run_list:
    recipe[apache]
    recipe[apache::addscreen]


Changing the order of recipes in a run list:

Run the chef node show command to view the order of the chef run:

[sahil@cwork recipes]$ sudo knife node show mychefnode
Node Name:   mychefnode
Environment: _default
FQDN:        cclient1
IP:          192.168.44.102
Run List:    recipe[apache], recipe[apache::addscreen]
Roles:
Recipes:     apache, apache::default, apache::addscreen
Platform:    centos 7.0.1406
Tags:

Now to set/change the order use the knife run_list set command as shown below:

[sahil@cwork recipes]$ sudo  knife node run_list set mychefnode "recipe[apache::addscreen]","recipe[apache]"
mychefnode:
  run_list:
    recipe[apache::addscreen]
    recipe[apache]


Run knife node show again to check the current chef run order:

[sahil@cwork recipes]$ sudo knife node show mychefnode
Node Name:   mychefnode
Environment: _default
FQDN:        cclient1
IP:          192.168.44.102
Run List:    recipe[apache::addscreen], recipe[apache]
Roles:
Recipes:     apache, apache::default, apache::addscreen
Platform:    centos 7.0.1406
Tags:

I bascally told chef client to apply the addscreen recipe before the default recipe.


Using capture groups in grep in Linux

Introduction Let me start by saying that this article isn't about capture groups in grep per se. What we are going to do here with gr...