Sunday, 6 November 2016

Exploring "Infrastructure as code" with Opscode Chef Part 2 (lab setup)

In the lab setup I've used chef version 12 & Cent OS 7 for the server, workstation & client components. I've tried to configure everything following the path of least resistance i.e the easiest way I could think of.

The system details:

192.168.44.100  cserver  => central chef server
192.168.44.101  cwork => chef workstation
192.168.44.102  cclient1 => chef client node.


Chef admin user "sahil" is created on all machines with sudo access. This is the user we'll be using to manage chef.

Installing chef server:

Download & install the chef server core rpm:
[root@cserver ~]# rpm -ivh chef-server-core-12.10.0-1.el7.x86_64.rpm
warning: chef-server-core-12.10.0-1.el7.x86_64.rpm: Header V4 DSA/SHA1 Signature, key ID 83ef826a: NOKEY
Preparing...                          ################################# [100%]
Updating / installing...
   1:chef-server-core-12.10.0-1.el7   ################################# [100%]

Next run "chef-server-ctl reconfigure" to configure chef server related services ie: Nginx, RabbitMQ, Postgresql, Solr & much more.

[root@cserver ~]# chef-server-ctl reconfigure

----------------
    - /var/opt/opscode/local-mode-cache/cookbooks/private-chef/recipes/redis_lb.
  Cloning resource attributes for directory[/var/opt/opscode/nginx/etc/addon.d]
Previous directory[/var/opt/opscode/nginx/etc/addon.d]: /var/opt/opscode/local-m
Current  directory[/var/opt/opscode/nginx/etc/addon.d]: /var/opt/opscode/local-m
    - /var/opt/opscode/local-mode-cache/cookbooks/private-chef/recipes/nginx.rb:
Chef Client finished, 394/468 resources updated in 04 minutes 14 seconds
Chef Server Reconfigured!

This will take a while to complete as it does a lot of work.

Once finished, we can check the status of the services:

[root@cserver ~]# chef-server-ctl status
run: bookshelf: (pid 5907) 317s; run: log: (pid 5938) 316s
run: nginx: (pid 5790) 321s; run: log: (pid 6123) 310s
run: oc_bifrost: (pid 5728) 323s; run: log: (pid 5763) 322s
run: oc_id: (pid 5778) 321s; run: log: (pid 5783) 321s
run: opscode-erchef: (pid 6005) 314s; run: log: (pid 5982) 315s
run: opscode-expander: (pid 5867) 317s; run: log: (pid 5882) 317s
run: opscode-solr4: (pid 5807) 319s; run: log: (pid 5814) 319s
run: postgresql: (pid 5698) 324s; run: log: (pid 5711) 323s
run: rabbitmq: (pid 5611) 325s; run: log: (pid 5604) 325s
run: redis_lb: (pid 5223) 451s; run: log: (pid 6119) 311s
[root@cserver ~]#

Next, we move to installing the web interface (chef manage)
[root@cserver ~]# chef-server-ctl install chef-manage
OR
[root@cserver ~]# rpm -ivh chef-manage-2.4.4-1.el7.x86_64.rpm
warning: chef-manage-2.4.4-1.el7.x86_64.rpm: Header V4 DSA/SHA1 Signature, key ID 83ef826a: NOKEY
Preparing...                          ################################# [100%]
Updating / installing...
   1:chef-manage-2.4.4-1.el7          ################################# [100%]

Thank you for installing the Chef Management Console add-on!

Next, we need to let chef configure the web interface provided by chef-manage:
[root@cserver ~]# chef-manage-ctl reconfigure
To use this software, you must agree to the terms of the software license agreement.
Press any key to continue.
Type 'yes' to accept the software license agreement, or anything else to cancel.
yes
--------------------------------------------------------------------------
Running handlers:
Running handlers complete
Chef Client finished, 88/188 resources updated in 63.818536296 seconds
chef-manage Reconfigured!
[root@cserver ~]#

This step involves accepting the license agreement. As I mentioned earlier the web interface is free for up to 25 nodes only & you would incur a subscription free for more than 25 nodes.

Now we create the user & organization:
 sudo chef-server-ctl user-create sahil sahil suri sahil@example.com 123456

In the above command:
sahil: user name
sahil suri: full name of the user
sahil@example.com: the user's email address
123456: the user's password.

sudo chef-server-ctl org-create testorg "TestOrg.Ltd" --association_user sahil

In the above command:
testorg: organization short name.
TestOrg.Ltd: organization long name.
sahil: the admin user for chef

you can optionally create an organization from the web interface as well.

Now that the chef server components & users are setup, let's open up a browser to https://<chef server IP> which in this case is https://192.168.44.100


Installing & configuring chef workstation:

We'll download & install the chef development kit rpm.

[sahil@cwork ~]$ sudo rpm -ivh chefdk-0.19.6-1.el7.x86_64.rpm
warning: chefdk-0.19.6-1.el7.x86_64.rpm: Header V4 DSA/SHA1 Signature, key ID 83ef826a: NOKEY
Preparing...                          ################################# [100%]
Updating / installing...
   1:chefdk-0.19.6-1.el7              ################################# [100%]
Thank you for installing Chef Development Kit!

The development kit installs a suite of software required by the chef workstation most importantly the chef knife utility.

We can run 'chef verify' to confirm that required components have been successfully installed.
[sahil@cwork ~]$ sudo chef verify
Running verification for component 'berkshelf'
Running verification for component 'test-kitchen'
Running verification for component 'tk-policyfile-provisioner'
Running verification for component 'chef-client'
Running verification for component 'chef-dk'
Running verification for component 'chef-provisioning'
Running verification for component 'chefspec'
----------------------------------------------------------

If your workstation will primarily be used to manage Chef for your infrastructure, you will likely want to default to the version of Ruby installed with Chef. You can do this by modifying your .bash_profile so that Chef's Ruby takes precedence:
echo 'eval "$(chef shell-init bash)"' >> ~/.bash_profile

Next we go the chef server web interface to get the 'chef starter kit'.
To do this, open up the web interface & go to administration tab. From there under the organization section click on starter kit. Then just click on download starter kit & copy it to the chef workstation.


Chef starter kit is an archive that contains the directory structure for the chef-repo repository as well as knife utility & cookbook settings. 
I've copied the chef starter kit to the home directory of the admin user i.e sahil. Now let's extract it.

[sahil@cwork ~]$ unzip chef-starter.zip
Archive:  chef-starter.zip
  inflating: chef-repo/README.md
   creating: chef-repo/cookbooks/
  inflating: chef-repo/cookbooks/chefignore
   creating: chef-repo/cookbooks/starter/
   creating: chef-repo/cookbooks/starter/attributes/
  inflating: chef-repo/cookbooks/starter/attributes/default.rb
   creating: chef-repo/cookbooks/starter/files/
   creating: chef-repo/cookbooks/starter/files/default/
  inflating: chef-repo/cookbooks/starter/files/default/sample.txt
  inflating: chef-repo/cookbooks/starter/metadata.rb
   creating: chef-repo/cookbooks/starter/recipes/
  inflating: chef-repo/cookbooks/starter/recipes/default.rb
   creating: chef-repo/cookbooks/starter/templates/
   creating: chef-repo/cookbooks/starter/templates/default/
  inflating: chef-repo/cookbooks/starter/templates/default/sample.erb
  inflating: chef-repo/.gitignore
   creating: chef-repo/.chef/
   creating: chef-repo/roles/
  inflating: chef-repo/.chef/knife.rb
  inflating: chef-repo/roles/starter.rb
  inflating: chef-repo/.chef/sahil.pem

Downloading authentication keys:
The chef workstation requires 2 authentication keys to interact with the chef server. The first is the adminuser.pem file which we got from the chef starter kit & is located as /home/sahil/chef-repo/.chef/sahil.pem. The second key is the organization validation key.
To get this, open up the web interface & go to administration tab. From there under the organization section click on 'reset validation key'. This will bring up a new key. Click on download to download the key.


Copy the downloaded key testorg-validator.pem to the chef workstation under /home/sahil/chef-repo/.chef/

Configuring knife:
The working on knife command can be modified by editing the knife.rb file found in ~/chef-repo/.chef/knife.rb
[sahil@cwork .chef]$ cat knife.rb
# See https://docs.getchef.com/config_rb_knife.html for more information on knife configuration options

current_dir = File.dirname(__FILE__)
log_level                :info
log_location             STDOUT
node_name                "sahil"
client_key               "#{current_dir}/sahil.pem"
validation_client_name   "testorg-validator"
validation_key           "#{current_dir}/testorg-validator.pem"
chef_server_url          "https://cserver/organizations/testorg"
cookbook_path            ["#{current_dir}/../cookbooks"]
[sahil@cwork .chef]$

Here is a description of the different parameters:
·  node_name: This specifies the name that knife will use to connect to your Chef server. This should match your user name.
·  client_key: This should be the name and path to the user key that you copied over from the Chef server. We can use the #{current_dir} snippet to fill in the path if the key is in the same directory as the knife.rb file.
·   validation_client_name: This is the name of the validation client that knife will use to bootstrap new nodes. This will take the form of your organization short name, followed by -validator.
·  validation_key: Like the client_key, this includes the name and path to the validation key you copied from the Chef server. Again, you can use the #{current_dir} Ruby snippet to specify the current directory if the validation key is in the same directory as the knife.rb file.
·  chef_server_url: This is the URL where the Chef server can be reached. It should begin with https://, followed by your Chef server's domain name or IP address. Afterwards, the path to your organization should be specified by appending /organizations/your_organization_name.

h Now we need to obtain the chef servers' SSL certificates. to do this type:
[sahil@cwork .chef]$ sudo knife ssl fetch
WARNING: Certificates from cserver will be fetched and placed in your trusted_cert
directory (/home/sahil/chef-repo/.chef/trusted_certs).
Knife has no means to verify these are the correct certificates. You should
verify the authenticity of these certificates after downloading.
Adding certificate for cserver in /home/sahil/chef-repo/.chef/trusted_certs/cserver.crt
[sahil@cwork .chef]$

We can use the following command to check if our chef workstation has been configured correctly:
[sahil@cwork .chef]$ sudo knife client list
testorg-validator
[sahil@cwork .chef]$

 Bootstraping a client:
  
      Bootstrapping is the process of installing & configuring a chef agent on a client node so that it can be managed by chef. We do a bootstrap using knife which will communicate with the chef server API, create a logical client instance for the node.This client instance will authenticate the client node with the chef server via ssh keys & is responsible for communicating with the chef client API on the node
      Chef knife will then connect to client node via ssh & pass to the node the chef server URL, validation client name & the validation key. This information is maintained in knife.rb file. Once this payload has been sent to the client node it then downloads & install the required chef client version & will register the node with the chef server & finally run chef client.
      Type the following command to bootstrap a client node:

      knife bootstrap <nodename> -x <user name> -P <password> -N "Node" --sudo 

[sahil@cwork .chef]$ sudo knife bootstrap cclient1 -N mychefnode -x sahil -P 123456 --sudo
Doing old-style registration with the validation key at /home/sahil/chef-repo/.chef/testorg-validator.pem...
Delete your validation key in order to use your user credentials instead
Connecting to cclient1
cclient1 -----> Installing Chef Omnibus (-v 12)
cclient1   to file /tmp/install.sh.24640/install.sh
cclient1 trying wget...
cclient1 el 7 x86_64
cclient1 Getting information for chef stable 12 for el...
cclient1   to file /tmp/install.sh.24645/metadata.txt
cclient1 trying wget...
cclient1 sha1   cd53d4f6431e912d0ddafce3cabd113fec3dda05
cclient1 sha256 66a514699bddd3f507a3b80b687cd71079a09e2aa01fa8111bee7f06a95c44c7
cclient1 version        12.15.19
cclient1 downloaded metadata file looks valid...
cclient1   to file /tmp/install.sh.24645/chef-12.15.19-1.el7.x86_64.rpm
cclient1 trying wget...
cclient1 trying curl...
cclient1 Comparing checksum with sha256sum...
cclient1 Installing chef 12
cclient1 installing with rpm...
cclient1 warning: /tmp/install.sh.24645/chef-12.15.19-1.el7.x86_64.rpm: Header V4 DSA/SHA1 Signature, key ID 83ef826a: NOKEY
cclient1 Preparing...                          ################################# [100%]
cclient1 Updating / installing...
cclient1    1:chef-12.15.19-1.el7              ################################# [100%]
cclient1 Thank you for installing Chef!
cclient1 Starting the first Chef Client run...
cclient1 Starting Chef Client, version 12.15.19
cclient1 Creating a new client identity for mychefnode using the validator key.
cclient1 resolving cookbooks for run list: []
cclient1 Synchronizing Cookbooks:
cclient1 Installing Cookbook Gems:
cclient1 Compiling Cookbooks...
cclient1 [2016-11-05T10:24:21-04:00] WARN: Node mychefnode has an empty run list.
cclient1 Converging 0 resources
cclient1
cclient1 Running handlers:
cclient1 Running handlers complete
cclient1 Chef Client finished, 0/0 resources updated in 06 seconds

To verify that client has been bootstraped successfully:
[sahil@cwork .chef]$ sudo knife node list
mychefnode
[sahil@cwork .chef]$ sudo knife client list
mychefnode
testorg-validator
[sahil@cwork .chef]$

On the client, we can verify that chef client has been installed:
[root@cclient1 ~]# rpmquery chef
chef-12.15.19-1.el7.x86_64
[root@cclient1 ~]#

With the client now part of our chef managed infrastructure, we'll write our first cookbook in the next article.

Exploring "Infrastructure as code" with Opscode Chef Part 1


I recently decided to explore Chef & I'm presenting this series of posts sharing my understanding of the Chef software & how I implemented it in a lab environment. This is by no means an in depth guide but more of a narration of my understanding & methodology used to set up the environment.


Introduction:

Configuration management tools make it possible of deploy & maintain a consistent configuration across a large fleet of client systems while managing the configuration from a centralized server.
Chef is a popular configuration management tool written in ruby & erlang.


Main components of Chef:


Chef server: This is the central server which holds all configuration information pertaining to client nodes including node definitions, cookbooks & recipes. The central chef server has an optional web interface which provides several administrative capabilities to users managing chef.

Chef workstation: The chef workstation interacts with client nodes through the chef server. We write the desired node configuration in the form of recipes embedded in cook books on the chef workstation which are then uploaded to the chef server. The chef server applies these recipes to the nodes as per the administrator's specification.

Chef client node: Each client node has an instance of the chef client software running on it via which it communicates with the central chef server. The client node is the target of desired state configurations outlined in recipes applied by the central chef server. 


Chef variants:

Hosted chef: In this the chef server is managed by chef Team hosted on their cloud & the clients are charged a subscription fee. The workstation & chef client nodes are maintained on premise by the customers. Management of up to 5 client nodes is free.

Private chef: All components are configured & managed on premise by the customers. Using the optional chef server web interface for managing client nodes is free up to 25 nodes after which a subscription fee is applicable.

Open source Chef: This version has limited features but is free for use.

Chef solo: This variant of chef does not use a central chef server for deploying configurations across clients.


Some advantages of using chef:

  • Chef is available for a variety of OS platforms & is also compatible with many public cloud offerings.
  • It follows the principle of idempotence i.e, a chef recipe will be applied to a node only if that is required to bring the node in a desired state. For example, if we try to apply a recipe to a node to install apache but the node already has apache installed then the recipe will not be applied.
  • An entire infrastructure can be recorded in the form of a chef repository which can then be used as a blueprint to recreate the infrastructure from scratch.


Chef server components:

ErCheif: It is an API written in erlang & takes care of all API requests sent to chef server

Nginx: This is the front end load balencer. Every API request first goes to nginx & is then routed to appropirate API.

WEB UI: This provides a GUI console to manage the chef server. Its developed using ruby on Rails.

Message queue: This sends messages to the search index using Rabbit MQ, Chef expander & chef solr.
Rabbit MQ is an open source message oriented middleware base on advanced message queuing (AMQ) protocol.
Chef expander pulls messages from Rabbit MQ. Chef expander format & processes these messages & sends them to chef solr.
Chef solr is a fork of popular open source project Apache Solr & it indexes & searches these messages.
Search index is a dedicated search index repository for chef server. Search index stores messages as well as server names as clear text.

PostgreSQL: This is an object oriented relational database system used by chef server to store information about environments, nodes, data bags, roles, configs & node attributes.

Bookshelf: It stores all cook books that are uploaded to the chef server from the workstation along with the cookbook contents such as recipes, templates & so on.

Cookbooks: They contain anything & everything related to our infrastructure in the form of code.
A cookbook can contain recipes, attributes, information about files/directories that are to be created as well as templates.

Node objects: It consists of run lists & attributes. It's a JSON file stored on the chef server.
Run lists is an ordered collection of recipes/roles for a node & are executed in the same order as specified in the run list. It's possible for many objects to contain the same run list.
An attribute describes a specific piece of data on the node. Eg, info related to file systems, packages etc.

Policies: They define roles & environmental settings for the nodes.


Chef workstation components:

Chef Knife: Knife is a command line tool that allows users to interact with the chef server & chef repository. Adding, removing, changing configurations, of nodes in central chef server will be carried out by using this knife utility. Knife uploads data from chef repository & cookbooks to the chef server.

Chef repository: The chef repository stores data objects as code. These data objects include info about cook books, roles, environments, recipes, attributes. Basically, this is the place where every configuration component of central chef server is stored & is synchronized with the central chef server via the knife utility.


Chef client components:

Chef client: Chef client interacts with the chef server & is responsible for the initial node registration with the chef server. Before a chef client can run on a node, the node must be registered with the chef server.
Chef client executes all steps to bring the node into a desired state as directed by the chef server by pulling the cookbooks from the chef server & applying them. The process of bringing a node to the desired state is known as chef run.
In order to bring a node into the desired state & follow idempotence, chef client requires a lot of information about the node. This information is provided by OHAI.

OHAI: OHAI discovers & identifies all attributes related to the node. Eg, n/w, s/w & platform info.
Info discovered by OHAI is referred to as automatic attributes & is forwarded to chef server where it's stored.


How some traditional IT terminologies are mapped to chef:

Organization: In chef, an organization is like a unit under which we group nodes together. This may correspond to a company or a department inside a company. For example, servers belonging to the accounting department can be grouped into accounting organization when they are mapped as client nodes for management by chef.

Multi-tenancy: This implies that there can be multiple users with administrative access to chef.

Environment: This represents an application life cycle stage. For example, DEV, UAT, Production.

Roles: A role pertains to a specific functionality assigned or performed by the node. For example, a web server or database node.


 In this article we introduced the concept of chef & briefly explored the functionality of different chef components.
In the next article we'll setup our lab!

Get disk size in GB from prtvtoc command


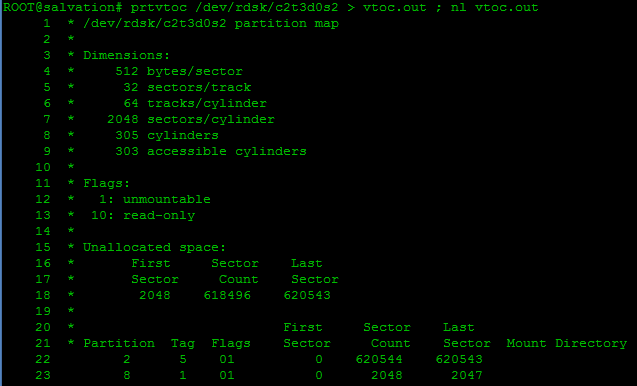
Prtvtoc is a great command to examine the disk geometry of a Solaris LUN but the size component is displayed in the form of number of sectors. For someone who is not a mathematical genius, converting sectors to GB with using calculators isn't possible.

So here is a one liner to get that disk size in gigs!


ROOT@salvation# SIZE=$(prtvtoc /dev/rdsk/c2t3d0s2 | awk '$1 ~ /2/ {print $5}'); echo disk size is $(bc <<< "scale=4 ; ${SIZE} *512/1024/1024/1024") GB
disk size is .2958 GB

Explanation:

The trick is to take apart the prtvtoc output in the form of rows & columns.Then I used awk to do a regex match to print column 5 if the corresponding row counterpart in column 1 is equal to 2. 
Since in Solaris the backup slice (slice 2) represents the overall size of the disk, there would be a slice 2 showing up in the partition column.
That gave me the sector count which I then fed to bc. We couldn't do the arithmetic via bash built ins because bash doesn't work with floating point values. In the bc command, the parameter 'scale' represents the level of precision after the decimal point.

Using this one liner as a script:

If you have more than one disks to check, a script should be the way to go.
This is a short script which does what the one liner mentioned above did:

 ROOT@salvation# cat disk_size.sh
#!/bin/bash

##Script to calculate disk size in GB using prtvtoc##

SIZE=$(prtvtoc /dev/rdsk/${1}s2 | awk '$1 ~ /2/ {print $5}')

SIZEinGB=$(bc <<< "scale=4 ; ${SIZE} *512/1024/1024/1024")

echo "Size of disk $1 is $SIZEinGB GB"


Script execution:

To run the script just supply the disk name as an argument to the script & that's it.
Here are a couple of sample runs:

AVAILABLE DISK SELECTIONS:
       0. c0d0 <▒x▒▒▒▒▒▒▒▒▒@▒▒▒ cyl 3260 alt 2 hd 255 sec 63>
          /pci@0,0/pci-ide@7,1/ide@0/cmdk@0,0
       1. c2t0d0 <VMware,-VMware Virtual S-1.0-15.00GB>
          /pci@0,0/pci15ad,1976@10/sd@0,0
       2. c2t1d0 <VMware,-VMware Virtual -1.0 cyl 98 alt 2 hd 64 sec 32>
          /pci@0,0/pci15ad,1976@10/sd@1,0
       3. c2t2d0 <VMware,-VMware Virtual -1.0 cyl 200 alt 2 hd 64 sec 32>
          /pci@0,0/pci15ad,1976@10/sd@2,0
       4. c2t3d0 <VMware,-VMware Virtual -1.0 cyl 303 alt 2 hd 64 sec 32>
          /pci@0,0/pci15ad,1976@10/sd@3,0
       5. c2t4d0 <VMware,-VMware Virtual -1.0 cyl 405 alt 2 hd 64 sec 32>
          /pci@0,0/pci15ad,1976@10/sd@4,0
       6. c2t5d0 <VMware,-VMware Virtual -1.0 cyl 508 alt 2 hd 64 sec 32>
          /pci@0,0/pci15ad,1976@10/sd@5,0
Specify disk (enter its number): Specify disk (enter its number):

ROOT@salvation#
ROOT@salvation# ./disk_size.sh c2t1d0
Size of disk c2t1d0 is .0957 GB
ROOT@salvation# ./disk_size.sh c2t2d0
Size of disk c2t2d0 is .1953 GB
ROOT@salvation# ./disk_size.sh c2t3d0
Size of disk c2t3d0 is .2958 GB
ROOT@salvation# ./disk_size.sh c2t4d0
Size of disk c2t4d0 is .3955 GB
ROOT@salvation# ./disk_size.sh c2t5d0
Size of disk c2t5d0 is .4960 GB


For loop variation:

You can also construct a one liner for loop using the script for multiple disks in one go like the example shown below:

ROOT@salvation# for i in  c2t{1..5}d0; do ./disk_size.sh $i ; done
Size of disk c2t1d0 is .0957 GB
Size of disk c2t2d0 is .1953 GB
Size of disk c2t3d0 is .2958 GB
Size of disk c2t4d0 is .3955 GB

Size of disk c2t5d0 is .4960 GB

Friday, 4 November 2016

Script to get disk details in Solaris [scanluns]

We can use the format command to view disk information & the prtvtoc command to list the partition map of the disks. Format is menu driven so if we need to check details for say 100 disks, it might take a while. Prtvtoc shows the space allocation in the form of sectors which again isn't exactly 'human readable'.

So, here is a script to get disk details in a very readable & convenient fashion.

#!/bin/bash
# script to scan the LUNS for HP 3Par storage in Solaris()
# @(#) v0.1 scanluns 
PATH=$PATH:/usr/bin:/usr/sbin
export PATH
echo | format > /tmp/format.out
for x in `cat /tmp/format.out | egrep "(3PAR|VIOLIN)" | grep -v available | awk '{print $2}'`
do
    Model=`luxadm display /dev/rdsk/${x}s2 | grep Vendor | awk '{print $2}'`
    Luns_size_MB=`luxadm display /dev/rdsk/${x}s2 | grep Unformatted | awk '{print $3}' | awk -F"." '{print $1}'`
    Luns_size_GB=`echo $Luns_size_MB/1024|bc`
    Luns_WWN=`echo $x | cut -c 4-35`
    Luns_Hex_ID=`luxadm display /dev/rdsk/${x}s2 | grep "Device Address" | awk -F"," '{print $2}' | sort -u`
    Luns_Hex_ID_Upper=`echo $Luns_Hex_ID | tr '[:lower:]' '[:upper:]'`
    Luns_Dec_ID=`echo "ibase=16; $Luns_Hex_ID_Upper"|bc`
    Operational_Path=`luxadm display /dev/rdsk/${x}s2 | grep State | grep ONLINE | wc -l`
    Failed_Path=`luxadm display /dev/rdsk/${x}s2 | grep State | grep OFFLINE | wc -l`
    #FP=`luxadm display /dev/rdsk/${x}s2 | grep Contr | awk '{print $2}' | sort -u | sed 's/^.\{8\}//' | tr ' ' '\n'`
    #FPINST=`grep $FP /etc/path_to_inst | grep '"fp"' | awk '{print $2}'`
    echo Disk: $x WWN Number: $Luns_WWN LUN ID: $Luns_Dec_ID Model: $Model  Size: $Luns_size_GB GB Working Paths: $Operational_Path Failed Paths: $Failed_Path
done


Just redirect the output of this script to a file & check for details of any disk by doing a grep for the required disk from the output file.

Here is a sample output:

grep c0t60002AC00000000000000BFA0000935Cd0 scanluns_out.03112016
Disk: c0t60002AC00000000000000BFA0000935Cd0 WWN Number: 60002AC00000000000000BFA0000935C LUN ID: 160 Model: 3PARdata Size: 1000 GB Working Paths: 16 Failed Paths: 0

Although this is specific for 3PAR disks but it can be tweaked for disks from other storage vendors as well.

Thursday, 3 November 2016

Script to calculate used/free resources in a Solaris global zone

This post is a sort of a follow up to an earlier post Quick 2 liner to measure used global zone resources in which I mentioned how we can get the compute usage details of local zones by typing just two commands. It was easy at first but then I found it painful to type both commands & then use bc again to calculate available resources by subtracting the used resources from the total resources on the global zone. So I got lazy & wrote a script to do the whole thing for me.

Here is the script:

#!/bin/bash

##script to calculate used compute resources by local zones & available CPU & RAM in a Solaris global zone##

totalcpu=0
totalram=0

for i in $(zoneadm list | grep -v global)

do

usedcpu=`zonecfg -z $i info dedicated-cpu | grep ncpus | awk '{print $2}'`
let "totalcpu += $usedcpu"

usedram=`zonecfg -z $i info capped-memory | grep physical | awk '{print $2}'| tr -d "G"`
let "totalram += $usedram"

done

##Print used resources##

echo -e "total used CPUs is:" $totalcpu
echo -e "total used RAM in GB is:" $totalram

##Set total resources in global zones##

allocatedcpu=512
allocatedram=1024

##calculate free resources##

availablecpu=$(expr $allocatedcpu - $totalcpu)
availableram=$(expr $allocatedram - $totalram)

##Print free resources##

echo -e "free cpu count is:" $availablecpu
echo -e "free RAM in GB is:" $availableram

##end of script##


Here is the output from a sample run:

total used CPUs is: 388
total used RAM in GB is: 944
free cpu count is: 124
free RAM in GB is: 80

Using capture groups in grep in Linux

Introduction Let me start by saying that this article isn't about capture groups in grep per se. What we are going to do here with gr...